Shower compartments under the ADA are defined by precise dimensional, fixture, and usability requirements that determine whether a bathing space can be used safely and independently by people with mobility disabilities, including wheelchair users and people who transfer to a seat. In practice, I have seen more compliance problems in showers than in many other plumbing elements because teams focus on clear floor space and grab bars but miss critical details like control location, threshold height, hand shower reach, and seat type. This topic matters because shower design directly affects dignity, privacy, risk of falls, and whether a facility truly provides equivalent access in hotels, hospitals, dormitories, shelters, athletic facilities, and residential settings covered by accessibility laws. Within ADA Accessibility Standards, Chapter 6 addresses plumbing elements and facilities broadly, including drinking fountains, water closets, lavatories, bathtubs, and shower compartments. A good hub article on Chapter 6 must connect those elements, because shower compliance does not exist in isolation: turning space, door swings, lavatory clearances, and toilet room layouts often shape what is possible inside the bathing room. The key terms are straightforward. A transfer-type shower is designed for someone who moves from a wheelchair onto a seat inside the compartment. A roll-in shower allows wheelchair entry without a curb. Controls include valves, diverters, and hand shower operation points. Seats may be folding or fixed, depending on the shower type and the applicable technical provision. Understanding those distinctions early prevents expensive redesigns later.
How Chapter 6 frames shower accessibility requirements
Chapter 6 of the ADA Accessibility Standards organizes plumbing requirements by element type and then links them to technical sections that specify exact measurements. For showers, the most important distinction is between transfer showers and roll-in showers, because each type has a different footprint, entry condition, seat expectation, and control arrangement. In plan review, I always start by asking what user transfer method the design is intended to support. If that question is not answered clearly, the resulting drawing often blends features from multiple shower types and ends up failing all of them. That happens, for example, when a designer sketches a large compartment like a roll-in shower but adds a seat and control wall layout meant for a transfer shower without preserving the required clear dimensions.
Chapter 6 should also be read alongside the circulation and reach provisions elsewhere in the standards. A compliant shower compartment can still be functionally unusable if the route to it is blocked by a door maneuvering conflict, a narrow toilet room arrangement, or a protruding lavatory. In hotels and healthcare occupancies, I routinely check the sequence of approach, turn, entry, transfer, bathing, and exit. Accessibility is not a single dimension on a fixture schedule; it is a complete use path. That systems view is especially important in renovation work, where walls, plumbing chases, and floor drains constrain options.
Another reason Chapter 6 matters is enforcement. Shower errors are visible, measurable, and commonly cited in audits, complaints, and litigation. A threshold that exceeds the permitted height, controls installed outside the reach range, or a seat mounted on the wrong wall are not abstract technicalities. They can prevent a person from bathing without assistance. For owners and specifiers, getting these details right reduces legal exposure and improves user outcomes at the same time.
ADA shower compartment types, required sizes, and entry conditions
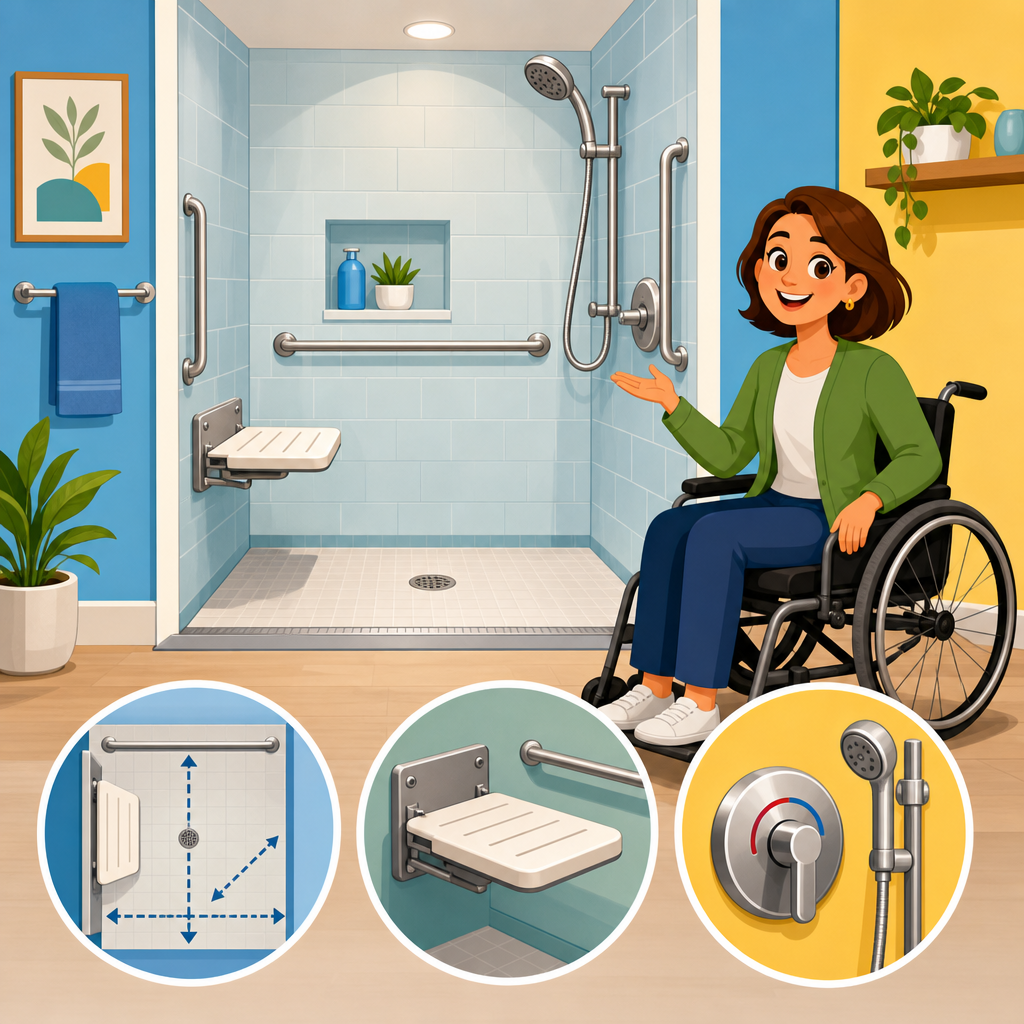
The ADA recognizes three commonly discussed accessible shower configurations: transfer-type showers, standard roll-in showers, and alternate roll-in showers. Transfer showers must be 36 inches by 36 inches inside clear dimensions, measured at the center points of opposing sides and excluding fixture projections except those specifically allowed. They are intended for side or diagonal transfer onto a seat. Because the compartment is compact, wall placement of the seat, controls, and grab bars is tightly coordinated. If dimensions creep larger in one direction without following another permitted configuration, the transfer geometry can become less workable rather than more accessible.
Standard roll-in showers are 30 inches wide minimum by 60 inches deep minimum. They allow a wheelchair user to roll directly into the compartment, which means the entry cannot have a conventional curb. Alternate roll-in showers are 36 inches wide minimum by 60 inches deep minimum and arrange the opening on the long side differently to accommodate approach and control access. In the field, alternate roll-in layouts often solve difficult room conditions better than standard roll-in layouts, but only if the seat, controls, and clear floor space are coordinated from the beginning.
Threshold treatment is a frequent point of confusion. Roll-in showers generally require no threshold, although a very low beveled threshold is permitted in certain cases under technical criteria. Transfer showers may include a threshold within the limited height allowed by the standards. Even when a threshold is technically permitted, I advise teams to minimize it as much as drainage performance allows, because every additional edge increases rolling resistance and trip risk. Slope also matters. The shower floor must direct water to the drain without creating a steep plane that destabilizes mobility devices or a seated bather.
| Shower type | Minimum inside size | Typical user approach | Seat expectation | Entry condition |
|---|---|---|---|---|
| Transfer-type | 36 in. x 36 in. | Wheelchair transfer to seat | Required | Limited threshold permitted by standard |
| Standard roll-in | 30 in. x 60 in. | Direct wheelchair entry | Not always required unless provided by scoping or program need | No curb, very low threshold only where permitted |
| Alternate roll-in | 36 in. x 60 in. | Direct wheelchair entry with alternate opening arrangement | Commonly provided and often required by program or other standards | No curb, very low threshold only where permitted |
These dimensions are the starting point, not the whole answer. Shower doors, if used, cannot impede required clearances or approach. Curtains are often the safer compliance choice because they avoid swing conflicts and track encroachment. I have also seen beautifully detailed tile showers fail because a built-in niche projected into the required clear dimension. In accessible showers, every inch counts.
Seats, grab bars, and transfer support details
Seats are central to shower usability, especially in transfer-type compartments. A transfer shower requires a seat, typically a folding seat mounted on the wall opposite the controls, positioned to support a stable transfer and allow access to the hand shower. Roll-in showers have more variation depending on the exact configuration and project type, but when a seat is provided, its location must still preserve maneuvering and control access. The most common error I find is a seat installed on the wrong wall because the millwork or plumbing layout was mirrored during coordination. That one mistake can make the compartment unusable for the intended transfer sequence.
Grab bars must be placed according to the shower type and wall configuration. Their purpose is not decorative reassurance; they provide leverage during transfer, standing stabilization, and repositioning under water flow. The dimensions, lengths, and wall locations are specific. In tile installations, grab bar backing must be coordinated before walls close. Too many retrofit projects rely on surface anchors in unsuitable substrates, which creates both safety and liability concerns. I insist on confirming backing locations on shop drawings, not merely on specifications.
Seat structure also deserves attention. Folding phenolic or padded seats are common in hospitality and healthcare settings, but their load capacity, hinge durability, and mounting detail vary widely by manufacturer. A product may look compliant in a cut sheet but fail in actual use if deflection is excessive or if hardware corrodes in a wet environment. Material selection should account for cleaning chemicals, institutional use, and replacement access. In sports facilities and dormitories, where use patterns are rougher, robust hardware matters as much as dimensions.
There is also a practical design tradeoff between fixed and folding seats. Folding seats preserve more floor flexibility for standing users and caregivers, while fixed seats can feel more substantial for users who distrust moving parts. The right choice depends on the shower type, user population, and applicable standards beyond the ADA, such as facility licensing or funding rules. The critical point is that seat selection cannot be treated as an aftermarket accessory decision. It is part of the compliance geometry.
Controls, hand showers, and operable parts that users can actually reach
Controls are one of the most litigated and misunderstood aspects of ADA shower design. The standards require operable parts to be within accessible reach ranges and located so a user can activate water without being under the spray before they are ready. In transfer showers, controls are placed on the wall opposite the seat and near the front edge so a seated user can reach them. In roll-in showers, the control wall depends on the configuration, but the same principle applies: users need direct, unobstructed reach from the seat or wheelchair position. If the valve is centered for visual symmetry rather than functional reach, the shower may fail both compliance and usability.
Hand-held shower sprays with hoses are essential because they support seated bathing and caregiver assistance. Mounting height, hose length, cradle position, and operability all affect real access. A slide bar can be useful, but only if the adjustment mechanism can be operated with one hand and without tight grasping, pinching, or twisting of the wrist. Thermostatic mixing is another practical requirement. Even when local plumbing code permits simpler valves, pressure-balancing or thermostatic controls reduce scald risk and improve user confidence. In senior housing and healthcare work, I strongly favor thermostatic systems because temperature swings can be dangerous for users with reduced sensation.
Controls should also be intuitive. I have watched first-time users struggle with diverter assemblies that require hidden sequences or excessive force. ADA compliance is not only about the nominal reach range. The operable parts rules require usability with limited dexterity. Lever handles generally outperform round knobs. Clear hot and cold indication, predictable flow control, and simple hand shower switching all reduce dependence on assistance. Where electronic controls are proposed, teams should verify power reliability, manual override options, and maintenance capacity. A sophisticated touch panel is a poor choice if staff cannot service it promptly.
Related Chapter 6 elements: toilets, lavatories, bathtubs, and drinking fountains
As the hub for Chapter 6, this page should connect showers to the broader set of plumbing elements and facilities that shape an accessible environment. Water closets need compliant clearances, grab bars, seat height, and flush control placement. Lavatories require knee and toe clearance, insulated pipes, and reachable faucets and accessories. Bathtubs have their own seat, grab bar, and shower spray provisions, often creating a different bathing option where shower transfer is not preferred. Drinking fountains must balance standing and wheelchair access, spout location, and approach requirements. These elements interact in real rooms, not as isolated code checklists.
A common hotel example illustrates the connection. An accessible guest bathroom may include a compliant roll-in shower, but if the lavatory projects into the turning space or the toilet clearance overlaps improperly with the shower opening, independent use breaks down. In schools and recreation centers, gang shower rooms often require careful transitions between accessible toilet rooms, lavatories, and shower stalls so users can move through the full sequence of activities. In healthcare, patient bathrooms must often accommodate staff assistance, durable equipment, and infection-control finishes while still respecting the technical dimensions.
This is why a sub-pillar strategy for Chapter 6 works well. Separate pages can go deeper on ADA drinking fountains, ADA toilet compartments, ADA lavatory requirements, ADA bathtubs, and operable parts, while this hub explains how the pieces fit together. Readers planning a project should treat Chapter 6 as an integrated design package. Decisions about one fixture almost always affect another.
Common compliance failures, inspection tips, and design strategies
The most frequent shower failures I encounter are predictable: wrong compartment dimensions, thresholds built too high after tile buildup, seats mounted on the incorrect wall, grab bars shifted to miss decorative tile joints, controls placed beyond reach, and hand showers that cannot be adjusted with limited dexterity. Another recurring problem is subcontractor substitution. A specified compliant seat or valve is replaced with a similar-looking product that changes projection, operability, or mounting geometry. Unless the design team reviews substitutions closely, those changes surface only at punch list, when correction is costly.
Inspection should happen in layers. First, verify rough framing and backing before finishes. Second, confirm plumbing rough-in locations for valves, sprays, and drains. Third, measure finished dimensions after tile, panels, and accessories are installed. I carry a tape, digital level, and annotated plan set because many failures are cumulative. A floor that is slightly out of level, a wall assembly thicker than anticipated, and a drain shifted off center can together destroy the intended layout. Mockups are valuable on large hospitality and multifamily projects because they expose these compound issues early.
From a design standpoint, the best strategy is to select the shower type based on the room envelope and user needs before schematic design ends. Do not force a transfer shower into a room that really needs roll-in access. Coordinate seat backing, grab bars, and valve placement in enlarged plans and interior elevations. Use manufacturer templates, but verify them against the governing standard rather than assuming compliance. Finally, include commissioning-style verification in the closeout process. Accessibility details deserve the same rigor owners apply to waterproofing, firestopping, and life safety systems.
Shower compartments under the ADA are successful only when size, seat placement, grab bars, controls, thresholds, and room layout work together as one coordinated system. Chapter 6 provides the framework, but real compliance comes from translating those provisions into buildable details and then checking them in the field. Transfer showers, standard roll-in showers, and alternate roll-in showers each serve different users and require different geometries. Seats are not interchangeable accessories. Controls must be reachable and operable with limited dexterity. Related plumbing elements such as toilets, lavatories, bathtubs, and drinking fountains also influence whether the full facility is actually usable.
The main benefit of understanding this chapter comprehensively is straightforward: you avoid expensive rework while creating bathing spaces people can use safely, privately, and with more independence. That is the standard owners should aim for, not bare technical compliance on paper. If you are planning, renovating, specifying, or auditing an accessible bathroom, use this hub as your starting point and then review each related Chapter 6 element in detail before construction documents are finalized.
Frequently Asked Questions
What shower sizes does the ADA require, and how do transfer showers differ from roll-in showers?
The ADA recognizes more than one compliant shower type, and the required size depends on how the user is expected to access the compartment. In general, the two most common accessible shower categories are transfer showers and roll-in showers. A transfer shower is designed for a person who approaches from outside the compartment and transfers onto a seat inside the shower. That is why the required compartment is more compact, typically 36 inches by 36 inches inside clear dimensions. The smaller footprint is intentional because it allows the user to stabilize during the transfer and reach controls, the shower spray unit, and grab bars without excessive stretching.
A roll-in shower is different because it is intended for direct wheelchair entry. These compartments are larger and must provide sufficient interior space for maneuvering. Standard roll-in showers are typically 30 inches by 60 inches minimum inside clear dimensions, while alternate roll-in configurations have their own permitted layout under the ADA standards. The exact configuration affects where the opening, controls, and seat may be located. This is where many design teams make mistakes: they remember the overall dimensions but overlook how the interior arrangement must support actual use.
It is also important to understand that size alone does not make a shower compliant. A compartment can measure correctly and still fail the ADA if the opening is wrong, the controls are out of reach, the threshold is too high, the seat is incorrectly placed, or the grab bars conflict with use. In real-world reviews, that happens often. The ADA is not just prescribing a box size; it is regulating a usable bathing environment that must support safe entry, transfer, bathing, and exit for people with mobility disabilities.
When is a shower seat required under the ADA, and what are the most common seat-related compliance mistakes?
Whether a seat is required depends on the type of shower compartment. Transfer showers require a seat because the entire design assumes the user will transfer from a mobility device onto that seat before bathing. Certain roll-in showers also require a seat, while standard roll-in showers may not require one in the same way depending on the exact configuration and applicable standard. Because the requirements vary by shower type, designers and facility owners should confirm the seat obligation based on the specific compartment being installed rather than assuming all accessible showers are treated the same.
Where a seat is required, its size, location, and structural support matter just as much as its presence. A common problem is installing a folding seat or built-in bench that is technically inside the shower but in the wrong location relative to controls or grab bars. If the user cannot transfer onto the seat safely, reach the controls from the seat, or use the grab bars in coordination with the seat, the design may not serve its intended purpose even if the room looks accessible at first glance.
Another frequent issue is substituting a residential-style bench or decorative ledge that does not meet ADA expectations for shape, support, or usability. A compliant seat must be positioned so that a person can make a lateral or angled transfer and remain stable while bathing. Teams also sometimes overlook the impact of seat depth and surrounding obstructions, such as glass enclosures, poorly placed partitions, or protruding trim. Those details can interfere with transfer and body positioning. In enforcement and plan review contexts, seat errors are common because the seat is often treated like an accessory when it is actually a critical part of the accessibility strategy for many shower users.
Where must shower controls be located to comply with the ADA, and why is control placement such a common violation?
Shower controls must be located within an accessible reach range and positioned so they can be operated from the seat or from the shower entry position, depending on the shower type. The ADA is very specific here because independent use depends on a person being able to turn the water on, adjust temperature, and direct the spray without standing in an unsafe position or reaching across flowing water. In transfer showers especially, the controls must be placed on the wall opposite the seat or in another compliant location specified by the standard so the user can reach them while seated. In roll-in showers, the location rules also relate to whether the shower is a standard or alternate configuration.
This area generates many violations because control placement is often delegated late in the design process to a plumber, fixture supplier, or contractor who may be thinking about convenience of installation rather than user access. The result is a compliant-looking compartment with controls mounted too far away, too close to the spray stream, or behind a glass panel edge that obstructs operation. Another common error is mounting the handheld spray unit and valves at heights or distances that exceed allowable reach ranges for a seated user.
The reason this matters so much is practical, not theoretical. If a person must lean dangerously, twist from the seat, or enter the spray zone before water temperature is adjusted, the shower is not safely usable. The ADA addresses that by requiring controls with operable parts that can be used without tight grasping, pinching, or twisting of the wrist, and by regulating their location. In the field, I often see projects that get the compartment dimensions right but fail because nobody checked whether an actual seated user could comfortably and safely reach the controls.
What does the ADA say about shower thresholds, and how can a small curb create a major compliance problem?
Threshold height is one of the most overlooked details in accessible shower construction. Under the ADA, shower thresholds are tightly limited because even a modest curb can interfere with wheelchair entry, create a tripping hazard, or make transfers more difficult. Roll-in showers in particular are expected to allow very low-resistance entry, which means the threshold must be minimal and carefully detailed. Transfer showers also have threshold restrictions, and the exact allowance depends on the type of compartment and applicable technical criteria.
The compliance issue usually arises because builders are trying to control water and default to familiar construction methods, such as adding a slightly higher curb, thick tile buildup, or an improperly sloped entry edge. From a construction perspective, that may seem minor. From an accessibility perspective, it can defeat the shower’s usability. A wheelchair caster can catch on it, a person using a walker can trip over it, and a seated transfer can become unstable if the entry edge is too high or uneven.
What makes threshold problems especially frustrating is that they often show up at the end of the project, after waterproofing, tile, and enclosure work are already complete. At that point, correction can be costly. The best approach is to coordinate waterproofing assemblies, floor recesses, finish thicknesses, and drain slopes early so the finished threshold meets ADA limits. Designers should also pay attention to adjacent floor conditions. A technically compliant threshold can still perform poorly if the exterior floor slope, drain placement, or door track creates water accumulation or awkward maneuvering. In accessible shower design, threshold compliance is not just a number; it is part of how the entire entry sequence works.
Besides size, seats, and controls, what other ADA shower details are commonly missed during design and installation?
Several other details repeatedly cause ADA shower failures, even on projects where the team clearly intended to comply. Grab bar placement is one of the biggest. It is not enough to include grab bars somewhere in the compartment; they must be mounted on the correct walls, at the correct heights, with the proper lengths and clearances, and in positions that work with the seat and controls. A grab bar that conflicts with a folding seat, shower door hardware, or a recessed niche may not function as required.
Handheld shower spray units are another common problem area. The spray unit must be usable from a seated position and connected to a hose of sufficient length. If the mounting location is too high, too far from the seat, or blocked by enclosures and trim, the shower may not be functionally accessible. Likewise, operable parts must comply with ADA requirements for usability, meaning they cannot require tight grasping, pinching, or twisting of the wrist. This applies not only to the valve handles but also to spray selectors, slide bars, and diverters.
Clear floor space and approach conditions outside the shower are also frequently mishandled. Teams may focus on the inside dimensions while forgetting that an accessible route, proper maneuvering space, and unobstructed transfer area are essential to real use. Shower doors, if used, can create issues if they reduce required clearance, swing into needed space, or introduce tracks and hardware that obstruct access. Finishes matter too. Floor surfaces should be stable, firm, and slip resistant under expected conditions. Even accessories such as soap dishes, shelves, and dispensers can become compliance issues if they protrude into required use zones or are placed out of reach.
The broader lesson is that ADA shower compliance is highly interdependent. You cannot review dimensions in isolation and assume the rest will work out. The seat, controls, threshold, grab bars, spray unit, opening, and clearances all have to function together for a person with a mobility disability to use the shower safely and independently. That is why showers generate so many violations: they are one of the clearest examples in accessibility design where small fixture decisions can undermine an otherwise well-intentioned layout.