ADA clear floor space rules shape whether a building works for real people using wheelchairs, scooters, walkers, canes, or other mobility aids. In Chapter 3 of the ADA Accessibility Standards, “Building Blocks” refers to the foundational dimensional rules that govern clear floor or ground space, turning space, knee and toe clearance, reach ranges, protruding objects, and operational spacing at elements such as doors, controls, fixtures, and service points. I have used these rules on tenant fit-outs, restroom renovations, reception desks, classrooms, and medical offices, and one lesson repeats on every project: accessibility problems usually come from small dimensional misses, not dramatic design failures. A lavatory set two inches too low in toe clearance, a wall-mounted cabinet that projects too far into a corridor, or a pull-side door with casework crowding the latch can turn a compliant-looking plan into a barrier.
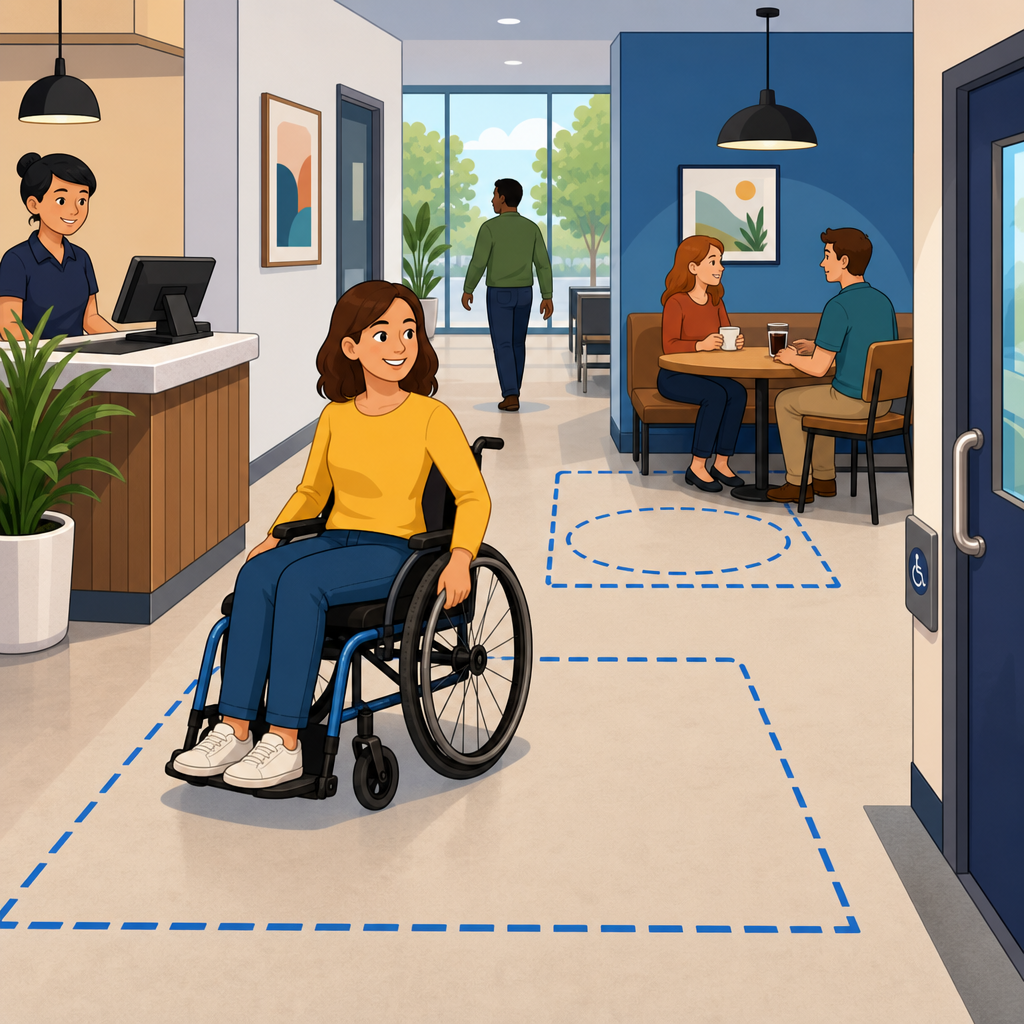
These requirements matter because they determine whether a person can approach, position, reach, maneuver, and use a feature independently. Clear floor space is the rectangular area needed to accommodate a stationary wheelchair user at an element. It typically measures 30 inches by 48 inches minimum, though orientation, overlap, and approach conditions matter. That basic rectangle connects to adjacent rules on accessible routes, turning circles or T-turns, and object clearances. Chapter 3 functions as the dimensional backbone for later chapters covering toilets, bathing rooms, kitchens, sales counters, drinking fountains, and work surfaces. If the building blocks are wrong, the fixture-specific sections will not save the layout.
For designers, contractors, facility managers, and business owners, understanding clear floor space early prevents expensive field changes and failed inspections. It also improves usability beyond minimum compliance. A break room with proper approach at the sink helps a wheelchair user, but it also helps someone carrying trays or pushing a cart. A retail fitting room with a true turning space serves parents with strollers and customers with temporary injuries. This hub article explains how the Chapter 3 building blocks work together in real-world layouts, where teams most often get them wrong, and how to review plans so accessible space remains usable after furniture, millwork, and equipment are installed.
What clear floor space means in practice
Clear floor or ground space is the unobstructed area required for a person using a wheelchair to approach and use an element. Under the ADA Standards, the minimum size is 30 inches by 48 inches. That sounds simple, but in practice the rectangle must actually be clear, correctly positioned, connected to an accessible route, and aligned for either forward or parallel approach depending on the element. In plan review, I do not just look for the symbol on the drawing. I check whether door swings, base cabinets, wall protection, seating, radiators, trash cans, and movable furniture invade the space once the room is occupied.
The rectangle can often overlap accessible routes, turning spaces, and knee or toe clearance, which gives designers flexibility in tight rooms. For example, at a drinking fountain, the wheelchair space may extend under the unit where toe clearance is provided. At a side-reach control mounted beside a clear space, the orientation of the 30-by-48 area determines whether a user can get close enough to operate it. On paper, these overlaps help compact design. In the field, they also create risk because one misplaced support leg or decorative panel can eliminate the overlap that made the layout work.
The most common misunderstanding is treating clear floor space as a generic empty patch anywhere near a fixture. It is not. The location must serve the function. At a lavatory, the user needs centered forward approach. At a transfer shower, the clear space must support transfer. At a sales counter, parallel approach may be acceptable at one feature while forward approach is needed at another. Designers who understand use sequence, not just dimensions, produce better layouts and fewer punch-list corrections.
How Chapter 3 building blocks work together
Chapter 3 is best understood as an interlocking system rather than a list of isolated dimensions. Clear floor space addresses stationary positioning. Turning space addresses reorientation, commonly a 60-inch diameter circle or a T-shaped turning space. Knee and toe clearance let a wheelchair user pull partly under an element, reducing reach distance. Reach ranges govern how high or deep controls can be. Protruding object rules protect cane-detectable travel zones. Door maneuvering clearances ensure the user can approach, grasp hardware, pull or push, and move through the opening. Each rule supports a different movement in a sequence of use.
Consider a single-user restroom. The accessible route gets the user to the room. Maneuvering clearance at the door allows entry. Turning space allows direction change once inside. Clear floor space at the lavatory permits use of the sink. Knee and toe clearance make the faucet reachable. Reach range affects soap dispensers and hand dryers. Protruding object limits affect wall-mounted accessories. Grab bar and toilet clearances from later chapters then depend on the foundational geometry already working. If one building block fails, the restroom may technically contain all the required fixtures but still be unusable.
This is why Chapter 3 is the hub for the rest of the standards. In my reviews, when a team struggles with an accessible kitchen, exam room, fitting room, or hotel bathroom, the root issue is usually not the specialty chapter. It is that the basic building blocks were never coordinated as one spatial system. Good layouts begin by placing turning space, door swings, and clear floor spaces first, then fitting fixtures around them rather than squeezing accessibility into leftover area.
Common layout scenarios and what to check
Real-world compliance depends on how these dimensions behave in ordinary rooms. Below is a practical review matrix I use when checking layouts during schematic design, permit drawings, and field verification.
| Scenario | Critical Chapter 3 check | Common failure | Better solution |
|---|---|---|---|
| Restroom lavatory | 30 by 48 clear floor space, forward approach, knee and toe clearance | Decorative apron or deep plumbing cover blocks toe space | Use compliant insulated pipes and a shallow protective panel |
| Drinking fountain | Clear space and cane-detectable limits for protrusion | Hi-lo unit projects too far into circulation path | Recess unit or add alcove with compliant clearances |
| Reception desk | Approach space at accessible counter and route to it | Queue rails or furniture block the counter approach | Reserve floor area with fixed layout controls |
| Door at small room | Maneuvering clearance plus latch-side dimension | Millwork placed within pull-side clearance | Shift casework or reverse swing where allowed |
| Classroom alcove | Turning space connected to accessible route | Loose seating consumes required turning area | Hold clear zone with furniture plan and signage |
| Break room kitchenette | Overlapping clear spaces at sink, appliances, and turning area | Appliance doors conflict with user positioning | Sequence appliances and provide true working aisle |
These examples show why dimensions should be checked in use, not just in isolation. In a break room, a sink may technically have clear floor space, but if the refrigerator door swings into that zone whenever open, the room becomes frustrating and sometimes unusable. In a reception area, the accessible counter may be built correctly yet blocked daily by planters, brochure stands, or queuing devices. The standard measures the built environment, but successful accessibility also requires operational discipline.
Doors, turning space, and circulation conflicts
Doors create some of the most frequent clear floor space conflicts because they combine moving parts, hardware operation, and approach geometry. The clear floor space at an element often sits near a door, and designers assume the door swing can simply overlap everything. Sometimes it can, sometimes it cannot. The key is to distinguish between door maneuvering clearance, fixture clear space, and turning space, then verify how all three interact. A compliant restroom on paper often fails in the field because the inswing door clips the lavatory approach or leaves no practical turning route around the water closet.
Pull-side maneuvering clearance is especially important because it requires space for a user to approach, operate the latch, and back up or pivot while pulling the door open. Latch-side wall dimensions matter. So do closers and opening force. I have seen office suites lose compliance when a last-minute full-height cabinet was added behind the pull side of an interior accessible door. The opening width remained correct, but the user could not position to grab and pull the hardware effectively.
Turning spaces are also misunderstood. A 60-inch circle must remain usable, not fragmented by protruding casework corners or furniture. In compact rooms, a T-turn can solve the geometry more efficiently, but only if each arm and base meet the standard and remain clear at floor level. Designers often draw a turning circle under counters without verifying knee and toe conditions, or they count the area under a toilet fixture where access is not actually usable. Circulation must be traced like a path of movement, not inferred from open-looking space.
Knee and toe clearance, reach ranges, and usability
Knee and toe clearance rules allow a wheelchair user to get closer to an element, which directly affects whether faucets, controls, outlets, operable windows, and transaction surfaces are within reach. In everyday layouts, these dimensions are often compromised by aesthetic enclosures, support framing, aftermarket storage, or deep countertops. At lavatories and work surfaces, the vertical and depth relationships matter as much as the clear floor space in front. If the user cannot tuck in, the effective reach becomes too long, even though the floor area appears compliant.
Reach range errors are common in renovations because new accessories are mounted relative to existing conditions rather than measured from the finished floor and actual approach. A hand dryer mounted above a waste receptacle, or a card reader installed behind a raised transaction ledge, can exceed usable reach limits. I have also seen accessible side reaches fail because the countertop depth pushed controls too far back. The lesson is simple: mount heights cannot be reviewed separately from approach geometry.
For real usability, think about the full action. Can the person roll in, position knees or toes where intended, see the control, activate it with one hand, and exit without backing into a hazard? This is why mockups help. On healthcare and higher education projects, taped floor layouts or cardboard templates often reveal issues long before millwork is fabricated. That small investment prevents costly rework and gives owners confidence that accessible features will function on opening day.
Protruding objects and maintaining clear space after occupancy
Protruding object rules are a safety issue as much as an access issue. People who are blind or have low vision rely on cane-detectable edges and consistent circulation zones. Wall-mounted cabinets, fire extinguishers, display screens, shelves, and artwork can project into paths of travel and create head or side hazards. In corridors and open lobbies, these conditions frequently appear after occupancy, when tenants add décor, vending, security devices, or informational displays that were never on the permit set.
Maintaining clear floor space after opening is one of the least discussed parts of compliance. Facilities teams may place trash bins under accessible counters, store boxes in transfer space, add portable air purifiers in corridors, or set merchandise racks into turning areas. None of those changes alter the base building, but they still create barriers. For that reason, I recommend an accessibility turnover checklist that includes furniture placement, accessory mounting verification, and a policy against storing items in required clearances.
Digital tools help here. Revit clash detection can flag spatial conflicts during design, while post-occupancy audits using mobile field apps can document encroachments with photos and dimensions. But tools only work if someone owns the process. The best operators assign responsibility to facilities or operations managers and review high-risk areas such as reception desks, restrooms, break rooms, and retail aisles on a recurring schedule.
Plan review, field measurement, and renovation strategy
To apply ADA clear floor space rules effectively, use a three-step process: plan review, field verification, and operational review. In plan review, start with accessible routes and doors, then place turning spaces, then verify clear floor space at each element. After that, check knee and toe clearance, reach ranges, and protruding objects. During field verification, measure finished conditions, not rough framing. Tile, wall protection, countertop overhangs, and hardware all affect final compliance. In operational review, confirm that furniture and equipment do not occupy required spaces.
Renovations deserve special attention because existing buildings rarely offer perfect geometry. The right strategy is to identify the controlling dimension early. In one café retrofit I worked on, the issue was not the accessible sales counter height; it was the queuing path that collapsed the approach space. In a medical office, the exam room sink was acceptable only after shifting a supply cabinet six inches to restore turning clearance. Small changes often solve large barriers when the underlying building blocks are understood.
For teams managing multiple locations, standard details and checklists reduce inconsistency. Create repeatable diagrams for lavatories, drinking fountains, service counters, and door clearances. Train installers and site superintendents on what cannot be value-engineered away. Most importantly, verify in the field before closeout. Accessibility is dimensional, and dimensions should never be assumed.
ADA clear floor space rules are not abstract code language; they are the practical geometry that makes buildings usable. Chapter 3 matters because it sets the dimensional framework for approach, turning, reaching, and safe circulation across every accessible element that follows in the standards. When designers and owners understand clear floor space as part of a coordinated system with doors, turning space, knee and toe clearance, reach ranges, and protruding object limits, layouts become more reliable and far less likely to fail during inspection or occupancy.
The most important takeaway is that compliance depends on use conditions, not just symbols on a drawing. A 30-by-48 rectangle must be properly located, connected, and kept clear over time. Door swings, casework, accessories, and furniture can all erase accessibility if they are not coordinated. The best results come from early planning, realistic mockups, careful field measurement, and post-occupancy discipline. That approach saves money, reduces change orders, and creates spaces people can use independently with dignity.
As the hub for Chapter 3: Building Blocks, this topic should guide every related detail in your ADA Accessibility Standards library, from turning space and reach ranges to protruding objects and door maneuvering clearances. Use this article as your starting framework, then review each adjoining subtopic with the same dimensional rigor. If you are planning a new layout or assessing an existing site, begin by tracing the user’s movement and measuring the required clearances before anything else.
Frequently Asked Questions
What does “clear floor space” mean under the ADA, and why is it so important in real-world layouts?
Clear floor space is the unobstructed area required so a person using a wheelchair, scooter, walker, or other mobility aid can approach, reach, and use an element safely and independently. In the ADA Accessibility Standards, this is one of the core “Building Blocks” because it affects almost everything else in a plan: doors, plumbing fixtures, service counters, controls, seating, appliances, and circulation paths. In practical terms, a compliant element is not truly usable unless someone can actually get to it and position themselves correctly once they arrive.
For many elements, the basic clear floor space is 30 inches by 48 inches minimum. That space can be oriented for either a forward approach or a parallel approach, depending on the fixture or operable element involved. But real-world compliance is about more than drawing a 30-by-48 rectangle on a plan. Designers also have to think about how a person enters that space, whether a door swings into it, whether adjacent walls restrict maneuvering, whether a countertop overhang changes usable knee or toe clearance, and whether nearby objects create hazards or awkward positioning.
In built work, clear floor space often becomes the make-or-break issue between technical compliance on paper and functional accessibility in daily use. A restroom accessory may be mounted at the correct height but still be unusable if a trash can blocks the approach. A thermostat may meet reach range rules yet be inaccessible because millwork projects into the required space. That is why Chapter 3 matters so much: it establishes the dimensional logic that turns accessibility from a checklist into a layout strategy. When clear floor space is planned early and coordinated with doors, walls, casework, and equipment, the result is a building that works more naturally for everyone.
What is the minimum ADA clear floor space requirement, and when do knee and toe clearance matter?
The standard minimum clear floor or ground space is 30 inches by 48 inches. This dimension is used repeatedly throughout the ADA Standards as the basic footprint needed for a wheelchair user to position at an accessible element. Depending on the application, that space can be aligned for a forward approach, where the user faces the element directly, or a parallel approach, where the user pulls alongside it. The required approach type depends on what is being used and how it is operated.
Knee and toe clearance become important when part of that 30-by-48 space is allowed to extend underneath an element such as a sink, lavatory, work surface, drinking fountain, or service counter. Without that under-element clearance, a forward approach may not actually be possible. In those cases, the ADA sets dimensional requirements for the height, depth, and width of the space available for knees and toes. These rules are not decorative technicalities; they are what allow a wheelchair user to get close enough to reach controls, use plumbing fixtures, or conduct transactions comfortably.
In layout practice, this is where many otherwise well-intentioned designs run into trouble. For example, a break room sink may have the correct rim height, but the exposed piping, a base cabinet, or a decorative apron can eliminate the needed knee clearance. A reception counter may appear accessible because it includes a lowered section, but if support panels or storage underneath block the approach, the usable clear floor space is compromised. The key is to treat the 30-by-48 requirement and the knee-and-toe requirements as coordinated conditions, not separate line items. If the user needs to roll under, the underside geometry matters just as much as the floor area in front.
How do door swings, circulation routes, and turning spaces affect clear floor space compliance?
This is one of the most common sources of confusion in actual projects. A required clear floor space does not exist in isolation; it has to function within the larger circulation and maneuvering environment around it. Door swings, required accessible routes, and wheelchair turning spaces can all overlap with some clearance requirements in certain situations, but they cannot interfere in a way that makes the element unusable. The exact allowance depends on the condition, so the safest approach is to evaluate the specific element, the approach direction, and the adjacent obstructions together rather than assuming all clearances can stack on top of each other.
Doors are especially important because they add both physical obstruction and user effort. A clear floor space at a fixture may look compliant until the door is opened, at which point the wheelchair position is blocked or pinned. Similarly, a turning circle or T-turn may technically fit within a room, but if a lavatory, toilet compartment door, or protruding accessory crowds that turning zone, real usability drops quickly. In small restrooms, fitting all the required components often depends on very careful coordination of swing direction, fixture spacing, and approach clearances.
On tenant fit-outs and renovations, this is why accessibility review should go beyond isolated dimensions. It is not enough to ask whether each item individually has a code-compliant box around it. You also have to ask whether a person can move from the accessible route into the room, navigate around the door, turn if needed, and then align with the element without reversing through tight angles or colliding with obstructions. Good ADA layout work is less about checking single numbers and more about understanding how those numbers interact in sequence. When that sequence works, the space feels intuitive. When it does not, even a technically drafted plan can fail in use.
Where do designers and contractors most often get ADA clear floor space wrong?
The most frequent mistake is treating clear floor space as a symbolic drafting block instead of a protected usability zone. On paper, teams may place the required rectangle in front of a sink, water cooler, control panel, or sales counter, but in the field that same space gets partially occupied by door trim, cabinetry, furniture, equipment, decorative panels, trash receptacles, or merchandise displays. Once those intrusions occur, the accessible feature may still look present, but it no longer works as intended for the user.
Another common issue is failing to coordinate the approach type. Some elements allow either forward or parallel approach, while others depend on one specific configuration. If the design assumes a forward approach but then installs a base cabinet below, or if a side approach is blocked by an adjacent wall return, the space may no longer be usable. Reach range mistakes also show up here. A control may be mounted within the nominal allowable height, but if a deep counter or obstruction sits in front of it, the user may not be able to get close enough to operate it comfortably.
Construction-phase substitutions create additional problems. Millwork supports get thickened, plumbing shifts, countertop edges extend farther than shown, or a door closer changes how much force and maneuvering room a user needs. In existing buildings, field conditions can be even more challenging because walls are rarely perfectly located and rooms may already be tight. The best prevention method is to review accessibility details at multiple stages: schematic layout, detailed design, shop drawing coordination, and final punch. ADA clear floor space compliance is strongest when the team verifies dimensions in section and elevation, not just plan, and when they protect accessible areas from “temporary” obstructions that tend to become permanent during occupancy.
How should clear floor space rules be applied in renovations, tenant fit-outs, and other real-world design constraints?
In renovations and tenant fit-outs, applying ADA clear floor space rules successfully usually comes down to prioritization, sequencing, and honest field verification. Existing conditions rarely cooperate perfectly. Structural columns, plumbing stacks, legacy partitions, and shallow lease spaces can all limit what is possible. Even so, the clear floor space rules in Chapter 3 remain foundational because they govern whether accessible elements can actually be reached and used. Rather than approaching accessibility as an add-on at the end, it should be one of the first filters used to organize the plan.
A practical method is to begin with the critical user actions: entering the space, approaching doors, turning, using restroom fixtures, reaching controls, completing transactions, and accessing work or amenity surfaces. From there, locate the required clear floor spaces and turning areas before finalizing walls, millwork, and equipment. This often reveals where a few inches make a major difference. Shifting a partition, reversing a door swing, reducing a cabinet depth, or relocating a dispenser can be the change that makes the whole room function accessibly. In tenant fit-outs especially, accessibility is often achieved through careful layout discipline rather than large square-footage increases.
It is also important to distinguish between what appears to fit and what can be defended under the ADA Standards. Tight existing spaces may tempt teams to rely on assumptions, but accessibility decisions should be grounded in actual dimensions, fixture specs, and clear understanding of overlap rules. Field measurement matters. So does anticipating how the space will be furnished and maintained after turnover. If movable items are likely to migrate into required clear floor spaces, the design should address that risk proactively. The most successful real-world ADA solutions are not just technically compliant at permit; they remain usable after installation, occupancy, and everyday wear. That is the real test of a good layout.