Accessible route design for tight sites and existing buildings is one of the most practical and misunderstood parts of ADA Accessibility Standards because it turns legal requirements into the actual paths people use to enter, move through, and benefit from a site or facility. In ADA terms, an accessible route is a continuous, unobstructed path connecting all accessible elements and spaces, and it can include walking surfaces, ramps, curb ramps, elevators, and platform lifts where permitted. Chapter 4 of the 2010 ADA Standards for Accessible Design establishes the core technical and scoping framework for these routes, including width, slope, cross slope, headroom, changes in level, doors, ramps, elevators, and limited-use circulation components. For tight sites and existing buildings, the challenge is rarely understanding the goal; it is fitting compliant circulation into inherited constraints such as shallow setbacks, historic entries, narrow structural bays, split levels, crowded utility rooms, and small elevator lobbies. I have worked on retrofits where one inch of wall furring, one misplaced door closer, or one drain inlet in the wrong spot broke compliance. That is why this topic matters: accessible route design affects building permits, usability, risk exposure, construction cost, and daily dignity for occupants and visitors. A well-designed route is not merely technically compliant. It is intuitive, durable, and integrated into the main experience rather than hidden as a secondary path.
What Chapter 4 Covers and Why It Controls So Many Design Decisions
Chapter 4 is the circulation backbone of the ADA Standards. It addresses accessible routes broadly and then ties those routes to the technical requirements for walking surfaces, ramps, curb ramps, elevators, platform lifts, and doors that occur along the path. In practice, this means route design starts early, often before room layouts are finalized, because circulation geometry determines whether spaces can connect accessibly at all. On constrained projects, I begin by mapping every required connection: site arrival points, public sidewalks, parking, passenger loading zones, entrances, service counters, toilet rooms, work areas that require common-use circulation, assembly seating, lodging rooms, and exterior amenities. If one required destination lacks a compliant route, the design is incomplete even if every isolated room appears compliant.
The core design questions are straightforward. Where does the accessible route start? Which entrances must it connect? Does it coincide with the route used by most people? Can it be continuous without stairs? Are the running slopes and cross slopes within tolerance after drainage and structural movement are considered? Can doors along the route provide required clear width and maneuvering clearances? In new construction, these questions are answered through integrated planning. In existing buildings, answers often involve exceptions, alterations obligations, and technically infeasible conditions, but those limits are narrower than many owners assume. Existing conditions do not erase the duty to improve access where work occurs.
For sub-pillar planning, Chapter 4 also functions as a hub because nearly every detailed accessibility topic connects back to the route itself. Parking is only useful if it links to an accessible entrance. Entrances matter only if interior circulation continues without barriers. Toilet rooms, dining areas, patient rooms, and recreation spaces all depend on route continuity. That is why this page should anchor deeper articles on walking surfaces, ramps, curb ramps, elevators, platform lifts, doors and gates, maneuvering clearances, and alteration strategies for existing facilities.
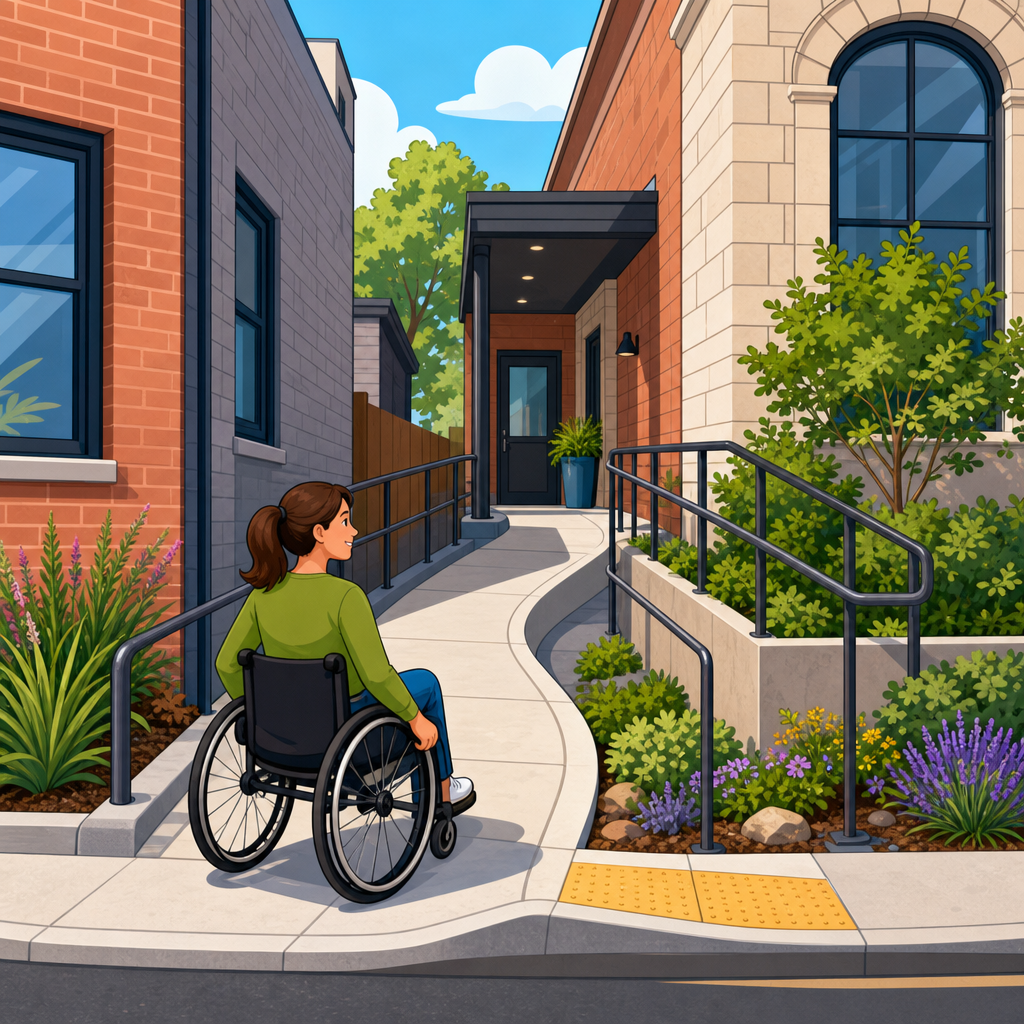
How to Define a Continuous Accessible Route on Constrained Sites
On a tight site, accessible route design begins with continuity and directness, not with isolated dimensions. The route must connect accessible site arrival points to accessible building entrances and then connect accessible interior spaces. The most common mistake is creating a technically compliant segment that dead-ends at a stair, a heavy door with no clearance, or a level change that was left for later resolution. I have seen projects pass schematic review with compliant parking aisles and curb ramps, only to fail during permit because the route crossed a drive aisle without a safe landing, narrowed at a gate post, and reached an entry stoop with no room for a ramp run.
Where space is limited, the best design move is usually to align the accessible route with the primary pedestrian route and remove level changes rather than trying to add separate accessibility features afterward. Regrading a walk by a few inches over a longer distance often solves more problems than inserting a short, steep ramp with handrails, edge protection, and drainage complications. On existing urban parcels, using the public sidewalk grade strategically can also reduce the amount of rise that must be resolved on private property, provided transitions remain smooth and jurisdictional approvals are secured.
Inside existing buildings, continuity often breaks at vestibules, split levels, or narrow corridors created by renovations over decades. The route should be traced door by door, not assumed from floor plans. Measure clear width at projections, confirm latch-side maneuvering at each approach direction, and verify headroom at soffits, stairs, and sloped ceilings. In older buildings, accessible route failures commonly occur at thresholds, carpet transitions, and isolated changes in level caused by patchwork floor finishes. A route that looks flat on paper may exceed allowable tolerances once underlayment, tile buildup, and settlement are accounted for.
Critical Technical Dimensions Designers Must Get Right
The accessible route must provide enough clear width for passage, enough headroom for safety, and enough levelness for stability. The commonly cited clear width is 36 inches minimum, subject to specific allowances for passing spaces and short constrictions, but experienced designers know width must be protected from encroachments. Door hardware projections, wall-mounted extinguishers, casework corners, and closer arms can reduce effective width after construction. In tight corridors, I detail dimensions to the finished face of all permanent elements and then review submittals for any protrusion risk. The minimum number on a plan is not a safe design target when tolerances and field conditions are considered.
Walking surfaces on accessible routes must be stable, firm, and slip resistant. In practical terms, this means avoiding loose gravel, deeply beveled pavers, highly irregular stone, and soft surfaces that deform under wheelchair loads. Exterior concrete remains the most reliable option because it supports precise slopes and durable joints. Unit pavers can work if installed on a rigid, well-prepared base with tight joints and minimal lippage, but maintenance matters. I have seen otherwise compliant routes become unusable within two winters because settlement created abrupt vertical changes at utility trenches and root heave lifted panels beyond allowable limits.
Changes in level are another recurring problem. Small vertical differences may be permitted within strict limits, but once those limits are exceeded, beveling or a ramped solution is required. Designers should not treat these tolerances as a convenience for poor detailing. Every threshold, drain edge, elevator sill, and flooring transition on the route must be coordinated. The best field result comes from a finish schedule that identifies thicknesses early and from slab depression planning that prevents accidental lips at restroom entries, tenant demising lines, and storefront replacements.
Slopes, Cross Slopes, and Drainage in Real Projects
Slope is where many accessible route designs fail, especially outdoors. The running slope determines whether a path is a walk or a ramp, while cross slope affects wheelchair tracking, cane stability, and user comfort. Even if a route appears compliant in design software, poor grading transitions can create local exceedances that trigger noncompliance. On site projects, I always review spot elevations at every ten to twenty feet, at each direction change, and at every landing because a single diagonal warp can invalidate an otherwise acceptable path.
Drainage is the usual source of conflict. Civil engineers need positive flow away from buildings, landscape architects want subtle grading, and accessibility requires controlled slopes with minimal cross pitch. The solution is not to waive accessibility for drainage; it is to design drainage intentionally. Slot drains, area drains outside required clear spaces, and longer grading transitions are usually more effective than forcing water across the route. At building entries, recessed grates and steep apron conditions regularly compromise both slope and wheel passage. A level landing protected by overhead cover and flanked by drainage elements usually performs better than a sharply pitched entrance plaza.
Existing buildings add another challenge: settlement. A route that met tolerance at completion may now be out of compliance because slabs have rotated or sidewalks have cracked. Owners should treat accessible route maintenance as a continuing operational duty. Regular surveys after freeze-thaw cycles, utility work, and landscape growth are essential. The Department of Justice has consistently taken the position that maintenance matters. A compliant design that is not maintained can still produce barriers.
Ramps, Curb Ramps, Elevators, and Platform Lifts in Tight Conditions
When a walking route cannot stay within allowable slope, a compliant change-of-level strategy is required. Ramps are the most familiar option, but they consume space quickly because rise, run, landings, handrails, and edge protection all add length and width. On constrained sites, a switchback ramp may fit geometrically but still fail functionally if landings overlap door swings, drainage paths, or property setbacks. I have had better results by redistributing grade over a longer accessible walk, lowering the first floor slightly where feasible, or reconfiguring site walls to create a more gradual approach rather than forcing a monumental ramp into a tiny forecourt.
Curb ramps deserve equal attention because they often form the first or last link in the route. Their placement, flare treatment, counter slopes, and detectable warnings must align with the pedestrian travel path, not merely fit where curb geometry is convenient. A misaligned curb ramp can direct users into traffic or into ponding water. On alteration projects, replacing one corner without checking the entire intersection often creates mismatches between curb ramp orientation and crosswalk location. That is technically poor and operationally unsafe.
Inside existing buildings, elevators are often the clearest way to maintain route continuity across levels, but they are expensive and require shaft, pit, overhead, electrical, and lobby space. Platform lifts may be permitted in specific situations, such as stages or certain existing condition applications, but they should not be treated as a universal shortcut. They can solve isolated vertical access needs when used carefully, yet they often introduce reliability, supervision, and maintenance issues. If a lift is locked, obstructed, or out of service, the accessible route effectively disappears. For primary circulation in occupied buildings, an elevator is usually the stronger long-term solution.
| Condition | Best Primary Option | Why It Works | Common Risk |
|---|---|---|---|
| Minor exterior grade difference over available distance | Regrade walk | Preserves direct route without adding ramp complexity | Local drainage can create excessive cross slope |
| Larger rise at main entry with limited frontage | Reconfigure site and lower approach where feasible | Often shorter and more integrated than switchback ramps | Retaining walls and utilities may constrain excavation |
| Interior level change between occupied floors | Elevator | Provides dependable primary circulation and broad usability | High cost and significant spatial requirements |
| Isolated vertical access in permitted situations | Platform lift | Fits tighter footprints than an elevator or full ramp | Operational downtime can interrupt access |
Doors, Entrances, and Maneuvering Clearances That Break the Route
Many accessible routes fail not in corridors or ramps but at doors. A route is only as usable as its narrowest and most awkward doorway. Clear width, threshold height, hardware operability, opening force where limited by applicable rules, and maneuvering clearance on both sides all matter. In small vestibules, the geometry between consecutive doors is especially critical. I routinely find pairs of compliant doors arranged so closely that wheelchair users cannot position between them to operate the second leaf. This is common in older storefront retrofits where new security vestibules are inserted without enough depth.
For existing buildings, door replacement can be a high-value accessibility improvement because it solves multiple route issues at once. Offset pivots can increase clear width without structural work. Automatic operators can reduce force and improve independence at heavy exterior doors. Narrow-profile frames can recover fractions of an inch that matter in masonry openings. Still, no hardware upgrade can fix missing maneuvering space. If a latch-side clearance is not present, the surrounding walls, sidelights, or vestibule layout may need redesign.
Main entrances should be accessible whenever possible, not side or service entrances. Separate accessible entries are a last resort because they create stigma and operational uncertainty. If security or historic preservation concerns limit changes at a ceremonial stair, a parallel accessible entrance should still be equally visible, unlocked during the same hours, and connected by clear signage and direct routing. The user experience matters. A technically legal but confusing route is a poor design outcome.
Strategies for Existing Buildings, Alterations, and Historic Constraints
Existing buildings require a disciplined approach that balances code obligations, budget, structure, and preservation. Start with an access audit that documents barriers by route segment, not by isolated rooms. Then prioritize improvements that restore continuity: entry access, floor-to-floor access where required, accessible toilet rooms serving altered areas, and route connections to primary functions. In alterations, the concept of disproportionate cost may affect how much additional path-of-travel work is required, but it does not excuse ignoring obvious low-cost barriers such as thresholds, hardware, signage, or minor regrading.
Historic buildings demand precision rather than exemption by assumption. Preservation standards may limit changes to character-defining features, yet many access improvements can be integrated discreetly. I have used landscape grading to avoid handrails at a historic terrace, concealed an entry platform within a stone cheek wall, and relocated reception functions to an accessible level while longer-term vertical access was phased. The right strategy depends on significance, feasibility, and equivalent facilitation concepts, but the burden is on the design team to study options carefully and document reasoning.
Construction administration is where route compliance is won or lost. Require slope verification before pour, mock up critical landings, and confirm field dimensions after framing but before finishes. Post-occupancy, establish maintenance procedures for snow removal, mat placement, door timing, and surface repair. If you are planning or renovating a constrained property, audit every required connection early and design the accessible route first, because every successful accessible building begins with a continuous path people can actually use.
Frequently Asked Questions
What is an accessible route, and why is it so important on tight sites and in existing buildings?
An accessible route is the continuous, unobstructed path that connects accessible parking, public sidewalks, building entrances, interior rooms, restrooms, service areas, and other accessible elements within a site or facility. Under ADA Accessibility Standards, this route is not just a theoretical line on a plan set. It is the actual path a person with a mobility, balance, vision, or stamina limitation must be able to use safely and independently. Depending on the conditions, an accessible route may include walking surfaces, ramps, curb ramps, elevators, and in limited situations platform lifts where they are specifically permitted.
On tight sites and in existing buildings, accessible route design becomes especially important because space constraints, grade changes, historic construction, structural limitations, and utility conflicts often make compliance more difficult than in new construction. That is also why it is commonly misunderstood. Teams may focus on individual components such as a compliant ramp slope or door width, but still fail to deliver a usable route if the path is interrupted, too steep, too narrow, blocked by site features, or disconnected from key destinations. The ADA looks at the route as a connected experience, not as isolated details.
In practical terms, a compliant accessible route is what allows people to enter a property, move between levels where required, access services, and use the same essential functions as other occupants or visitors. If the route fails, the accessibility of many other elements fails with it. A beautifully designed accessible restroom, reception desk, or meeting room does not provide meaningful access if a person cannot get there. That is why accessible routes are foundational in both site planning and renovation strategy. They are often the first issue to resolve and the one that influences nearly every other design decision.
How do designers handle accessible routes when there is very little space available?
When space is limited, the most effective approach is to start with route planning early and treat the accessible path as a primary organizing feature rather than trying to fit it in at the end. On constrained sites, that may mean rethinking parking layouts, relocating site amenities, shifting entrance locations, adjusting grading, or redesigning circulation patterns so the route remains continuous and practical. Inside existing buildings, it may require reworking partitions, door swings, millwork, or program adjacencies to eliminate pinch points and unnecessary level changes.
Designers often succeed on tight sites by reducing the number of conflicts the route must navigate. A shorter, more direct accessible path is usually easier to make compliant than a longer path with multiple turns, slope transitions, and obstructions. This may involve choosing the entrance that can be made accessible most effectively, consolidating access points, or repositioning accessible parking and passenger loading zones closer to the usable entrance. In buildings, it may mean identifying the most efficient path from entry to key functions and then coordinating all trades to keep that route clear.
Vertical access is another major issue where space is constrained. A long ramp system may technically work on paper but consume too much site area or create awkward landings that interfere with circulation. In those cases, teams may need to explore alternatives such as regrading the site, using an elevator, or using a platform lift where the ADA permits it. The right solution depends on the building type, the scope of work, and the location within the route. The goal is not simply to find any compliant element, but to create a path that is reliable, understandable, and dignified for users.
Careful field verification is also essential. Existing buildings frequently contain conditions not shown accurately on drawings, including slab variations, thresholds, wall offsets, and concealed structural constraints. On a tight project, even small discrepancies can affect maneuvering clearances and route widths. Successful accessible route design in limited space usually comes from combining code knowledge, precise measurements, interdisciplinary coordination, and a willingness to revise layouts to preserve continuity and usability.
What are the most common mistakes made when designing accessible routes in existing facilities?
One of the most common mistakes is assuming that if each individual component appears compliant, the overall route must also be compliant. In reality, accessible routes fail most often at the transitions between elements. A route may include a compliant ramp, for example, but still become inaccessible because of a narrow gate, an abrupt level change, a heavy door, an encroaching drinking fountain, or insufficient maneuvering clearance at the landing. Accessibility breaks down where continuity breaks down.
Another frequent mistake is treating the accessible route as an alternate or secondary path when the route to the main entrance or primary spaces remains inaccessible. While some existing conditions create complexity, the design objective should be to provide access that is integrated and equitable whenever possible. Sending users to a remote entrance, through service areas, or along a path that is significantly less convenient can create both usability and compliance concerns. Designers should evaluate whether the route provides real access to the same functions in a manner that is reasonably comparable to the experience of other users.
Projects also run into trouble when slope and cross slope are not assessed carefully across the full route. On existing sites, even surfaces that look relatively flat can exceed allowable limits due to settlement, patchwork paving, or poor drainage shaping. Similarly, interior routes may include subtle level changes at thresholds, transitions between finish materials, or legacy floor elevations that interfere with wheelchair use and create tripping hazards. Without detailed measurements and coordinated details, these issues are easy to miss until late in construction.
A final recurring problem is failing to connect all required accessible elements and spaces. Designers sometimes focus only on getting someone into the building, but the ADA requires access throughout the relevant portions of the facility. That means the route must continue to restrooms, service counters, meeting rooms, circulation spaces, and other areas required to be accessible. In renovation work especially, partial improvements can create the illusion of compliance while leaving key destinations unreachable. A good accessible route strategy maps the full user journey from arrival to departure.
How do ADA requirements apply differently in existing buildings versus new construction?
New construction generally has the highest expectation because the building or site can be designed from the start to incorporate compliant accessible routes and related features. In that context, the design team is expected to integrate accessibility into the overall layout, grading, circulation, and vertical access strategy. Existing buildings are more complicated because the ADA recognizes that alterations occur within physical and structural constraints. Even so, existing conditions do not eliminate accessibility obligations. They change how compliance may be evaluated and implemented depending on the type of facility, the scope of work, and whether the project is an alteration, barrier removal effort, or another form of improvement.
In altered areas, an accessible route generally must be provided to the altered space to the maximum extent feasible when full compliance is limited by existing structural conditions. That phrase is important because it does not mean convenience, budget preference, or design tradition. It refers to situations where full compliance is virtually impossible because of existing physical constraints. Designers and owners should be careful not to overuse that concept. Many route problems that seem difficult at first can be solved through thoughtful redesign, selective demolition, or better coordination.
There are also obligations related to path of travel upgrades in certain alteration projects, particularly when a primary function area is altered. In those cases, the route to the altered area and related elements such as restrooms, telephones, and drinking fountains may trigger additional accessibility work, subject to applicable limits and proportionality rules. This is one reason accessible route design should be reviewed early in renovation planning. If route deficiencies are discovered late, they can affect scope, budget, and approvals.
For existing facilities that are not undergoing full renovation, barrier removal may still be required where it is readily achievable under the ADA. In practice, improving an accessible route is often one of the highest-priority barrier removal measures because it affects whether people can enter and use the facility at all. The exact legal analysis can depend on the facility type and applicable standards, so owners should coordinate with qualified design professionals and legal counsel where needed. From a design standpoint, however, the core principle remains the same: the route must be continuous, usable, and connected to the accessible features people need to reach.
What is the best way to evaluate and improve an accessible route during a renovation or facility upgrade?
The best approach is to begin with a full route-based assessment rather than a checklist limited to isolated components. Start outside the property line or arrival point and trace the complete user path through the site and building. Document parking, passenger loading, sidewalks, curb ramps, entrances, doors, interior circulation, level changes, restrooms, service points, and destination spaces. Measure widths, slopes, cross slopes, landings, thresholds, and clearances in the field. Photographs, annotated plans, and spot elevations are extremely helpful because route problems are often cumulative and easiest to understand visually.
Next, prioritize deficiencies based on continuity and impact. A small finish issue in an otherwise usable corridor usually matters less than a route break that prevents entry or access to a primary function area. In many projects, the highest-value improvements are the ones that remove major barriers first, such as adding or correcting curb ramps, reducing excessive slopes, widening key pinch points, improving door maneuvering clearances, or reconfiguring an entrance sequence. On constrained projects, it is often better to create one clearly functional accessible route than to spread small changes across multiple incomplete paths.
It is also important