Toilet paper dispenser placement under the ADA is one of the smallest restroom details and one of the most frequently missed during remodels, tenant improvements, and fixture replacements. I have walked dozens of job sites where grab bars were installed correctly, clear floor space was preserved, and the dispenser still ended up too high, too far forward, or directly behind the user where it could not be reached without awkward twisting. That single miss can turn an otherwise polished restroom into a noncompliant one. For owners, architects, contractors, and facility managers working within ADA accessibility standards, restroom and plumbing details matter because they affect daily usability, inspection outcomes, and legal risk.
In this context, ADA refers to the federal accessibility requirements that apply through the 2010 ADA Standards for Accessible Design, while many projects also need to coordinate with ICC A117.1, state building codes, and local plan review comments. Toilet paper dispenser placement is not just about picking a side wall and guessing a height. It involves dimensions from the water closet, usable reach ranges, conflicts with grab bars, operable parts, and the actual way a person seated on the toilet accesses the roll. Remodels miss this detail because teams often treat accessories as finish items to be decided in the field, long after backing, rough-in locations, and stall geometry have been fixed. This hub page explains the rules, the measurements, the common conflicts, and the broader restrooms and plumbing issues that connect to dispenser placement so you can coordinate the entire room correctly from the start.
What the ADA requires for toilet paper dispensers
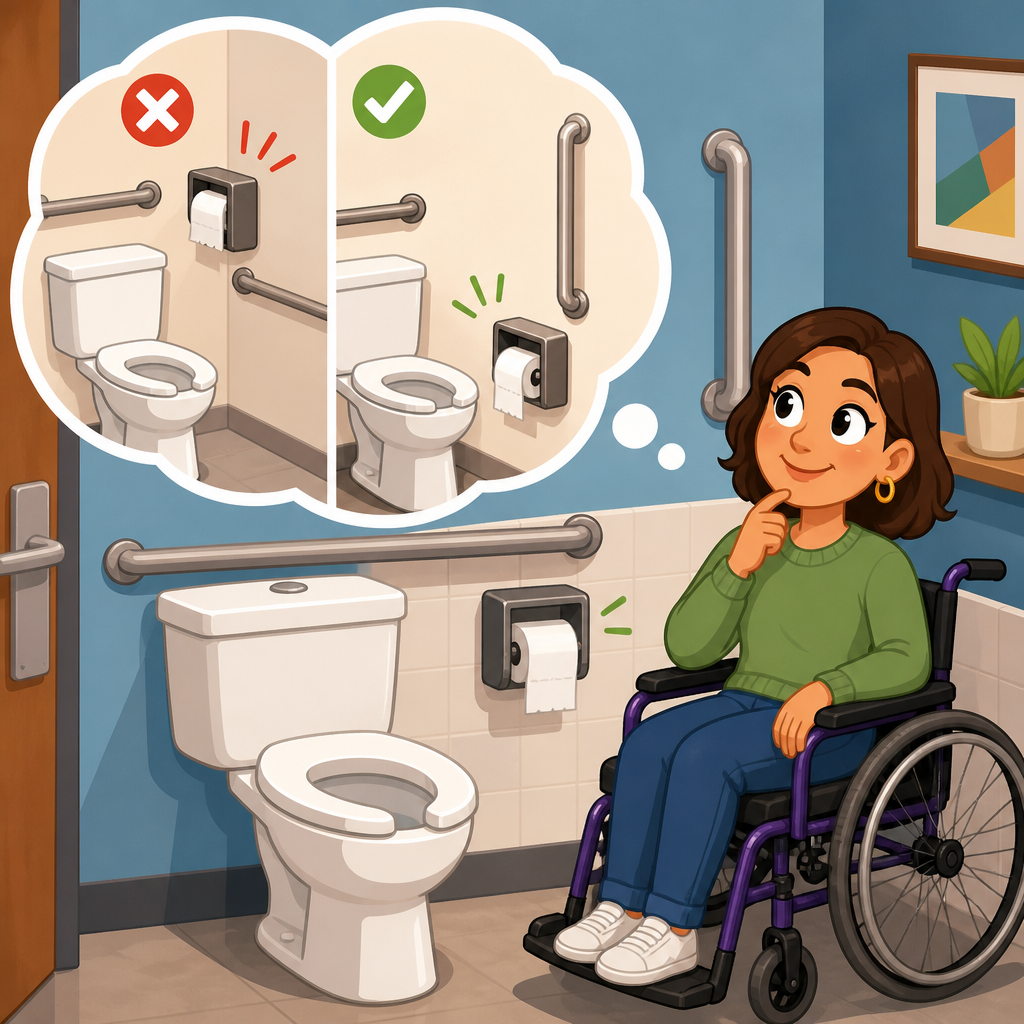
The core ADA rule is straightforward: toilet paper dispensers in accessible toilet compartments must be located on the side wall closest to the water closet, with the outlet positioned between 7 inches and 9 inches in front of the water closet measured to the centerline of the dispenser outlet, and the outlet between 15 inches and 48 inches above the finish floor. The dispenser cannot be of a type that controls delivery or does not allow continuous paper flow. In plain terms, the roll must be reachable from a seated position, placed slightly forward of the toilet, and usable without tight grasping, pinching, or twisting of the wrist.
The side-wall requirement is the point most often missed. Installers sometimes center the dispenser under the side grab bar, place it on the back wall to avoid conflicts, or move it farther forward because a partition pilaster or accessory blocks the preferred spot. Those workarounds usually create noncompliance. The location is tied to human movement. A user seated on the toilet should be able to reach paper with a short, natural motion rather than leaning far forward, reaching behind the trunk, or colliding with the grab bar. When I review restroom punch lists, this exact issue appears more often than lavatory height errors because it is easy to overlook until the room is nearly complete.
Another practical point is that the dimensions relate to the dispenser outlet, not simply the housing. Large jumbo-roll units can be deceptive. A contractor may measure to the body of the dispenser and believe it fits, while the actual paper exit point sits outside the allowed zone. That is why submittal review matters. Manufacturers such as Bobrick, Bradley, American Specialties, and Georgia-Pacific publish cut sheets with outlet geometry. If the outlet is buried in a deep cabinet, the product may not fit a compliant location even if the rough wall space looks adequate.
Why remodels get this detail wrong
Most toilet paper dispenser violations trace back to sequencing, not ignorance. On many remodels, the architectural set shows basic ADA stall dimensions but leaves accessory mounting to enlarged interior elevations, owner standards, or deferred field coordination. By the time the dispenser is selected, the side grab bar is already anchored, the partition layout is fixed, and the available wall area has narrowed. The installer then shifts the dispenser to a convenient spot that looks clean but does not satisfy the required reach and offset. I have seen this happen in office renovations, restaurant restroom updates, school modernization projects, and medical tenant build-outs.
Another reason is confusion between code sources. Teams may mix ADA measurements with plumbing fixture requirements or with an older office standard carried over from prior projects. Some state inspectors focus on building code language that references ICC A117.1, while federal enforcement and civil claims often point back to the ADA Standards. In well-coordinated projects, designers cross-check all applicable documents and use the more stringent requirement where necessary. In poorly coordinated projects, a shop drawing approved under one assumption collides with field inspection under another.
Product substitution also causes failures. A drawing may have been laid out around a compact dispenser, but procurement swaps in a jumbo-roll model because it reduces maintenance frequency. The larger housing pushes the outlet behind the permitted range or into the clear space needed for the grab bar. Maintenance teams often prefer high-capacity units for good reasons, especially in airports, schools, and stadiums, but capacity cannot override accessibility geometry. The right approach is to choose compliant high-capacity dispensers early, not retrofit them into a location that only works for a smaller unit.
How to measure placement correctly in the field
Field measurement should be done after the water closet centerline, finished wall location, grab bar placement, and partition faces are confirmed. Start at the front edge reference used by the standard: the dispenser outlet must be 7 inches minimum and 9 inches maximum in front of the water closet. On site, I mark the centerline of the toilet, confirm the side wall dimension, then project the required forward zone on the wall with tape. Next, I verify the outlet height, keeping it within the 15-inch to 48-inch range above the finish floor. Finally, I sit or simulate the seated reach path to confirm the dispenser is actually usable and not blocked by a grab bar return, partition edge, or oversized housing.
The phrase continuous paper flow matters too. Spring-loaded, metered, or restrictive dispensers may save paper, but they can create usability problems for people with limited dexterity. If a user must perform repeated small motions, pinch a hidden tab, or pull against a strong resistance mechanism, the dispenser may conflict with accessibility expectations even if its location is dimensionally correct. In practice, specifying a simple, gravity-fed or standard-roll model with a visible outlet reduces risk. Facility managers should test samples before bulk purchase rather than relying only on catalog descriptions.
| Checkpoint | ADA target | What remodel teams miss |
|---|---|---|
| Wall location | Side wall nearest the toilet | Placed on back wall or partition for convenience |
| Forward offset | Outlet 7 to 9 inches in front of the water closet | Measured to housing, not outlet |
| Height | Outlet 15 to 48 inches above finish floor | Mounted to match other accessories instead of reach range |
| Operation | Continuous paper flow | Specified restrictive or controlled-dispensing unit |
| Coordination | No conflict with grab bar use | Dispenser blocked by bar, return, or partition edge |
Grab bars, clearances, and accessory conflicts
Toilet paper dispenser placement cannot be checked in isolation. In accessible compartments, side and rear grab bars have specific lengths, heights, and locations, and those bars define the usable zone around the water closet. If the dispenser is tucked under the side grab bar but protrudes too far, the user’s hand can strike the dispenser while trying to grasp the bar. If it is placed too far forward to avoid that conflict, the reach becomes unnatural. The design challenge is to satisfy both access to paper and access to support. That is why the best restroom elevations show the toilet, bars, dispenser, and partition together, not as separate keyed notes.
Protrusion and operable parts deserve attention as well. Although the classic violation is incorrect offset, bulky dispenser housings can reduce perceived space and create awkward body movement in narrow compartments. This is especially true in alterations where existing wall conditions force compromises. In one retail remodel I reviewed, a recessed plumbing chase limited anchorage locations, so the installer surface-mounted a large double-roll unit exactly where the side grab bar needed clear hand access. The fix was not simply moving the dispenser; it required revisiting backing and selecting a slimmer unit. Accessory coordination is often less expensive during framing than after tile installation.
There is also a maintenance reality: broken springs, jammed stub-roll mechanisms, and refilling doors that hang open all affect usability. Compliance on opening day does not guarantee compliance six months later. Durable hardware, clear refill procedures, and periodic inspections matter. Facility teams should include dispenser function on restroom audit checklists alongside loose grab bars, flush control operation, lavatory clearances, and door closer force. Accessibility is operational, not just dimensional.
Restrooms and plumbing: the broader accessibility hub
Because this article serves as a hub for restrooms and plumbing within ADA accessibility standards, dispenser placement should be viewed alongside every other restroom element that affects user independence. Accessible toilet rooms depend on compliant clear floor space, maneuvering clearances at doors, correct turning space, lavatory knee and toe clearance, insulated pipes, mirror heights, soap and towel dispenser reach ranges, flush control location, and accessible signage. A single noncompliant item may not make the room unusable for every person, but clusters of small errors create a restroom that is technically and functionally broken.
Water closets themselves bring several key dimensions into the conversation. Seat height, centerline from side wall, flush control placement, and compartment width all influence how a user transfers and reaches accessories. Urinals require proper rim height and clear floor space. Lavatories must provide the right forward approach, faucet operability, and pipe protection. In family or single-user rooms, baby changing stations, waste receptacles, and shelves can intrude into clearances if not planned carefully. In multistall restrooms, the accessible route through the room matters as much as the fixture dimensions. Doors that swing into approach clearances, floor drains placed in turning areas, and janitorial storage in accessible compartments are all common field problems.
Plumbing standards intersect with accessibility at multiple points. Sensor faucets can improve use for some occupants but create problems if activation zones are unreliable. Flush valves should be operable without tight grasping, and maintenance staff should verify sensors do not time out too quickly. Hot water protection under lavatories is essential to prevent contact burns. Even finish selections matter: glossy floor tile with poor slip resistance can undermine an otherwise compliant layout. Good restroom design is therefore a coordination exercise between architecture, plumbing engineering, interiors, and operations, not a checklist assigned to one discipline at the end.
Best practices for designers, contractors, and facility owners
The most reliable way to avoid toilet paper dispenser errors is to document the exact location in elevations and specifications, then verify it during rough-in and again before closeout. Designers should call out the dispenser model, outlet location, mounting height, and relation to the water closet centerline. Contractors should not leave accessory placement to a finish carpenter or tile installer without dimensional references. Owners should review standards that may have been copied forward from older projects and remove any legacy details that conflict with current accessibility requirements.
Mockups are especially valuable on complicated remodels. In older buildings, walls are rarely plumb, concealed conditions shift fixture locations, and existing partitions can distort nominal dimensions. A full-scale field mockup with painter’s tape or cardboard templates can reveal conflicts before drilling begins. I recommend this approach in schools, hospitality renovations, and medical offices where repeat restroom layouts multiply both the risk and the cost of mistakes. One corrected mockup can prevent dozens of mislocated dispensers across a portfolio.
Finally, treat accessibility review as quality control rather than as a late compliance exercise. Include restroom accessories in submittal review, pre-installation meetings, punch walks, and maintenance inspections. Use manufacturer cut sheets, ADA Standards figures, and, where applicable, ICC A117.1 commentary to confirm assumptions. When in doubt, measure from the actual outlet and test the user reach path. That extra five minutes in the field is cheaper than relocating tile, patching backing, or defending a complaint after occupancy.
Toilet paper dispenser placement under the ADA looks minor on paper, but it affects whether a restroom works with dignity for the people who rely on it. The rule is precise for a reason: the dispenser belongs on the side wall, within a narrow forward range, at an accessible height, and with continuous paper flow. Remodels miss it when accessory decisions are delayed, substituted products are not rechecked, or installers measure the housing instead of the outlet. The correction is disciplined coordination.
As the hub for restrooms and plumbing within ADA accessibility standards, this topic connects directly to grab bars, water closet geometry, lavatory clearances, operable parts, sensor reliability, pipe protection, and maintenance practice. Accessible restrooms succeed when every element is coordinated as a system rather than inspected as isolated parts. If you are planning a restroom remodel, updating owner standards, or auditing an existing facility, start by reviewing the accessory elevations and field measurements now. Catching this small detail early prevents a surprisingly large compliance problem later.
Frequently Asked Questions
What does the ADA actually require for toilet paper dispenser placement?
The ADA does not treat toilet paper dispenser placement as a minor convenience item. It is part of the accessible reach requirements at the toilet and has to be located where a seated user can reach it without unsafe twisting, leaning, or overreaching. In accessible toilet compartments, the dispenser must be installed on the side wall nearest the toilet, typically below the side grab bar, within a defined reach range measured from the water closet centerline and above the finished floor. In practical terms, that means the dispenser cannot be randomly placed wherever it fits between tile joints, accessories, or backing locations. It has to land in a specific zone that allows the paper outlet to be usable from a seated position.
This is where remodels often go wrong. Installers may focus on the toilet clearances and grab bar lengths, then treat the dispenser as an afterthought. But ADA compliance depends on the dispenser being both present and functionally reachable. If it is too high, too far forward, buried behind the user, or blocked by the grab bar, it can fail even if the rest of the stall looks correct. The safest approach is to verify the current adopted accessibility standard for the project, confirm the exact mounting dimensions before wall finish goes in, and check the dispenser model itself because oversized units can create compliance problems even when the rough location seems right.
Why is toilet paper dispenser placement missed so often during remodels and tenant improvements?
It gets missed because it sits at the intersection of design intent, field conditions, and sequencing. On paper, the restroom may show a standard accessible stall with all the major code elements noted. In the field, however, walls get furred out, partitions shift slightly, grab bars move to hit backing, and the selected dispenser may be different from the one originally specified. By the time the accessory installer arrives, the ideal location may seem crowded or inconvenient, so the dispenser gets pushed forward, mounted too high, or placed wherever there is open wall. That is exactly how small deviations turn into real accessibility failures.
Another reason it is commonly missed is that many teams assume “close enough” is acceptable for restroom accessories. It is not. Toilet paper dispensers are one of those details where a few inches matter. The problem is especially common in remodels where existing tile, patching limits, plumbing locations, and partition layouts create pressure to compromise. Owners and contractors may also replace an older compact dispenser with a larger double-roll or commercial jumbo unit without reevaluating the reach impact. The result is a dispenser that technically occupies the side wall but is no longer usable within the ADA-required reach envelope. That is why experienced reviewers always field-check the installed unit, not just the drawing note.
How can a dispenser be noncompliant even if it looks like it is in the right area?
This is one of the most important things to understand. A dispenser can appear to be “next to the toilet” and still fail because compliance is about the usable dispensing point, not just the bracket’s general location. Large commercial dispensers are a frequent culprit. Their overall body can project into the user’s space, extend too far forward, or place the actual paper outlet in a location that requires excessive reaching. In some cases, the dispenser is technically under the grab bar but the roll is tucked so far behind the user that accessing it requires awkward twisting. In other cases, the unit is mounted within a reasonable horizontal zone, but the operating portion ends up too high above the floor.
Designers and contractors also run into trouble when they measure from the wrong reference point. ADA dimensions for accessible toilet elements are highly specific, and with toilet paper dispensers, the measured location must correspond to the required relation to the water closet and surrounding elements. If someone measures to the edge of the housing instead of the outlet, or uses the partition line instead of the toilet centerline, the installation can drift out of compliance without looking obviously wrong. This is why a visual inspection alone is not enough. You need actual field measurements tied to the correct reference points and the final installed product dimensions.
What are the most common installation mistakes to watch for on the job site?
The most common mistakes are mounting the dispenser too high, placing it too far forward of the toilet, locating it directly behind the user, and letting the grab bar interfere with access to the paper. These errors usually happen when the accessory installer is working from habit rather than from the accessibility details for that specific stall. Another frequent issue is selecting a dispenser that is simply too large for the available compliant zone. Double-roll and oversized commercial dispensers can be particularly problematic if no one verifies how far they project and where the paper actually dispenses.
There are also coordination mistakes that happen earlier in construction. Missing or misplaced wall blocking can force the installer to shift the dispenser away from the intended location. Tile layout decisions can tempt crews to center accessories visually instead of locating them by code-required dimensions. Partition substitutions can tighten the side-wall area enough that the dispenser no longer fits where it should. The best way to avoid these problems is to treat the dispenser as a code item, not a finish accessory. Confirm the exact model during submittals, provide backing in the correct zone, dimension the installation clearly on the drawings, and walk the restroom before closeout with a tape measure instead of relying on appearance.
What is the best way to make sure a restroom remodel does not fail over this small detail?
The best strategy is to build dispenser placement into your compliance process from the start rather than trying to fix it at punch list. During design, identify the exact accessible stall condition, note the required dispenser location clearly, and specify a dispenser model that can physically fit within the compliant reach range. During bidding and procurement, make sure substitutions are reviewed for size, projection, and outlet location, not just cost or finish. During rough-in, verify backing placement so the installer is not forced to improvise later. And during installation, field-measure from the correct reference points before the dispenser is permanently mounted.
For owners, facility managers, and contractors, the lesson is simple: do not assume an experienced tradesperson will automatically get this one right without direction. Toilet paper dispenser placement is one of the smallest restroom details, but it is also one of the easiest ways for an otherwise polished remodel to miss ADA compliance. A five-minute verification can prevent a failed inspection, a callback, or an accessibility complaint. If you are renovating restrooms, replacing accessories, or updating tenant spaces, treat the dispenser location with the same seriousness as the grab bars and toilet clearances. That is how you avoid the detail remodels miss most often.