Accessible exam table clearances determine whether patients can move safely from mobility devices to care surfaces, and they are one of the most consequential details in medical care design. In clinics, outpatient centers, urgent care suites, and specialty practices, the exam table is often the first place accessibility succeeds or fails. If there is not enough maneuvering room for a side transfer, a portable floor lift cannot approach, or staff must improvise in a cramped room, the result is delayed care, avoidable injury risk, and unequal treatment. Planning clearances correctly is not only a design exercise. It is a patient safety decision, an operational decision, and a compliance decision.
In this context, “clearance” means the unobstructed floor space around an exam table that allows patients, caregivers, wheelchairs, stretchers, and transfer equipment to approach and use it. “Side transfer” refers to a patient moving laterally from a wheelchair or scooter onto the exam surface, with or without a transfer board or staff assistance. “Lift use” refers to transfers performed with mobile floor lifts, sit-to-stand lifts where clinically appropriate, or ceiling-mounted systems. “Accessible medical equipment” includes exam tables, chairs, scales, mammography equipment, and diagnostic devices designed so people with disabilities can receive equivalent care. Within that category, the accessible exam table is foundational because primary care, orthopedics, obstetrics, dermatology, and many specialty visits depend on safe transfers to a flat surface.
I have worked on accessibility reviews where rooms met minimum door and turning requirements on paper yet still failed real patients because the table was centered without regard to transfer side, base shape, or lift swing radius. That mismatch is common. Teams focus on corridor widths, grab bars, and toilet rooms, then treat exam tables like ordinary furniture. They are not. Accessible equipment has use zones, caregiver zones, and patient approach zones that must function together. The best planning starts by asking practical questions early: Which side is intended for transfer? Can a wheelchair align parallel to the table? Does the table lower low enough for independent or assisted transfer? Can a floor lift base fit under the table? Is there enough room for staff to stand where they actually need to stand?
This article serves as the hub for medical care and accessible equipment under ADA accessibility standards. It explains how to plan exam table clearances for side transfers and lift use, how equipment selection changes room design, which clinical scenarios require more than the bare minimum, and what facility teams should verify before purchase, renovation, or survey. The goal is simple: create exam rooms where disabled patients can receive the same examination, on the same equipment, with the same dignity and clinical quality as everyone else.
Why accessible exam table clearances matter in medical care
Accessible exam table clearances matter because an accessible route to the room is meaningless if the patient cannot get onto the table. Federal disability law requires equal access to healthcare services, and regulators have repeatedly emphasized that inaccessible equipment can amount to discriminatory care when providers rely on weight estimates, visual-only exams, or hallway conversations instead of proper examinations. The issue is not theoretical. Patients who remain in wheelchairs during an exam may miss skin checks, musculoskeletal assessment, abdominal palpation, gynecologic positioning, and other routine components of care.
From an operational standpoint, poor clearance planning slows the clinic day. Staff spend extra time rearranging stools, carts, and waste bins, or they move the patient to another room that happens to be larger. That creates scheduling friction and privacy problems. From a safety standpoint, constrained transfers increase caregiver overexertion and patient fall risk. The Occupational Safety and Health Administration has long recognized patient handling as a major injury source in healthcare, and the safest transfer methods depend on space around the equipment. Good clearance planning therefore supports patient rights, staff ergonomics, and throughput at the same time.
Core planning principles for side transfers
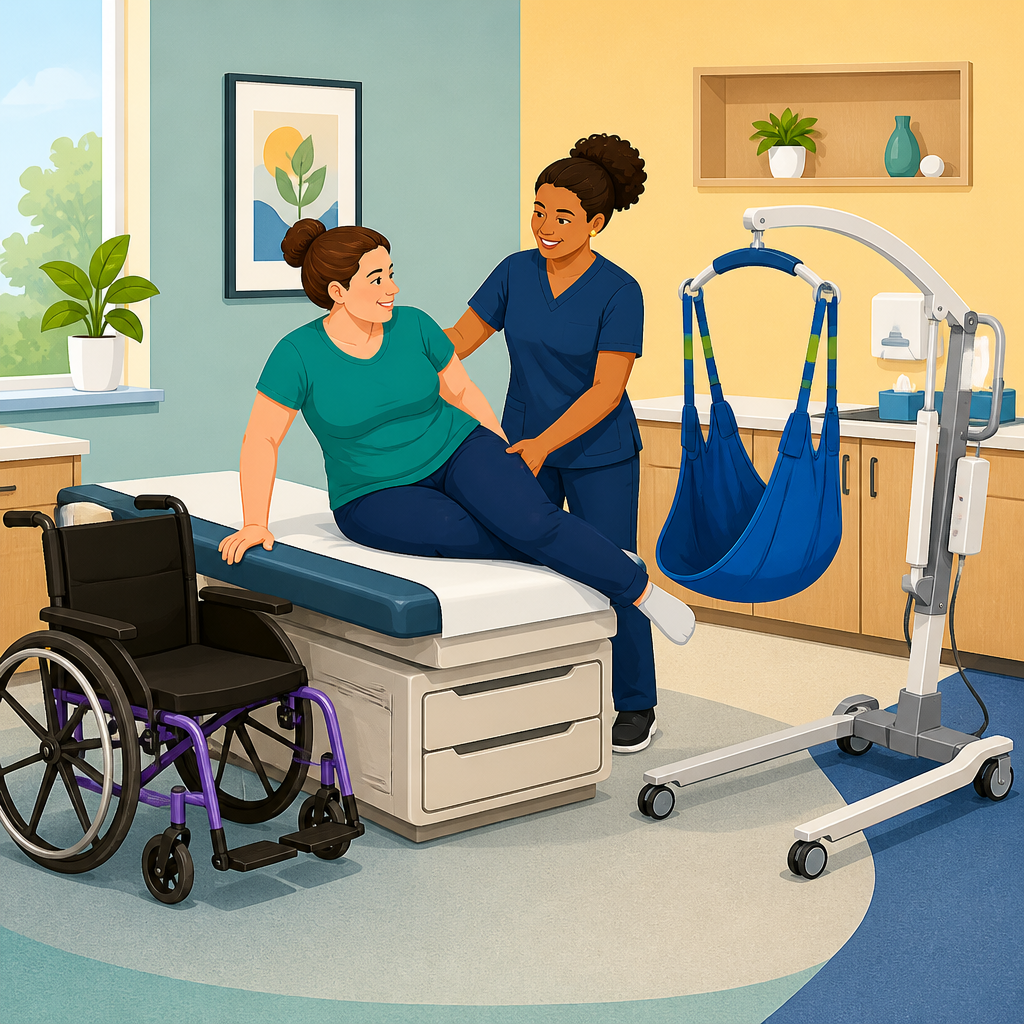
For most ambulatory settings, side transfer planning starts with a straightforward principle: one side of the exam table should be intentionally designated as the primary transfer side and kept consistently clear. In practice, that means avoiding built-in casework, fixed seating, sharps containers mounted too low, and mobile equipment storage in that zone. The wheelchair needs to approach parallel to the table so the patient can transfer laterally. When teams leave transfer direction ambiguous, rooms become less usable because every object competes for floor space.
Transfer success also depends on table height. The most usable accessible exam tables lower to a transfer height that aligns closely with many wheelchair seat heights, reducing the vertical gap patients must bridge. The U.S. Access Board’s work on accessible medical diagnostic equipment has reinforced the importance of low transfer heights, transfer supports, and unobstructed transfer surfaces. In real projects, I advise teams to verify the manufacturer’s minimum height under load, not just the catalog image. Some tables advertise accessibility yet sit several inches higher once accessories are added or when upholstery compression is considered.
Another principle is stability of the surrounding environment. A side transfer area should not double as a charting alcove or blood draw station. Patients transferring from a wheelchair need predictable handholds, direct alignment, and enough room for a caregiver if assistance is required. If a clinician stool, mobile ultrasound, or supply hamper routinely occupies that area, the room is not functionally accessible even if dimensions looked compliant during design review.
Planning for lift use and equipment approach
Lift planning requires a different mindset because the governing dimension is not just where the patient moves but how the lift base, mast, boom, and sling path move. Mobile floor lifts need approach space at the side or end of the table, and many require the lift base legs to slide under the table. That means the table’s pedestal, shroud, and under-table clearance directly affect usability. I have seen facilities purchase a nominally accessible table, then discover the decorative base blocked the lift legs, forcing unsafe manual transfers. Product cut sheets and base dimensions must be reviewed before procurement.
Ceiling lifts solve some floor-space conflicts, but they introduce track layout decisions, structural coordination, and the need to position the patient accurately over the table. In new construction, ceiling systems can be excellent in bariatric rooms, imaging transfer rooms, or specialty clinics with higher transfer-assistance needs. In small outpatient exam rooms, however, a ceiling lift does not remove the need for wheelchair maneuvering space, caregiver space, or a clear transfer side. It simply changes the mechanics of the lift.
Because lift use varies by patient population, facilities should define clinical scenarios in advance. A neurology practice, wound clinic, rehabilitation service, or high-volume primary care location serving many wheelchair users may need rooms intentionally designed around lift-assisted transfers. By contrast, a low-acuity office that rarely performs table-based exams may rely on fewer fully equipped rooms, provided scheduling and policies ensure equivalent care without delay. The key is matching room planning to actual patient use, not assuming one layout fits every specialty.
Recommended room features and common dimensional checks
No single dimension guarantees accessibility, but certain checks consistently separate workable rooms from performative ones. Designers should confirm clear door width, maneuvering clearances at the entry, turning space, and uninterrupted floor area on the transfer side. They should also verify space at the foot of the table if a lift or stretcher approach may be needed. For side transfers, enough parallel approach space must exist for a wheelchair and, when relevant, a caregiver. For lift use, confirm both the route into the room and the operating envelope at the table.
| Planning item | What to verify | Why it matters |
|---|---|---|
| Table transfer height | Lowest height under normal clinical setup | Reduces vertical gap for lateral transfer |
| Primary transfer side | Dedicated clear floor space, free of fixed obstructions | Supports wheelchair alignment and caregiver assistance |
| Under-table base clearance | Compatibility with mobile lift leg geometry | Determines whether floor lifts can approach safely |
| Foot-end clearance | Space for lift, stretcher, or clinician movement | Improves access for complex transfers and procedures |
| Accessories and supports | Grab supports, stirrups, rails, paper roll holders | Small components can help or hinder usable access |
| Operational storage | Location of stools, carts, hampers, and trash | Prevents encroachment into required transfer zones |
Exam room mockups are one of the best ways to validate these checks. Tape the table footprint on the floor, place a wheelchair alongside, simulate clinician positions, and test the path of a selected floor lift model. Mockups reveal conflicts that plans often hide, especially door swing interference, sink placement, and the tendency of wall-mounted accessories to protrude into the transfer side.
Choosing accessible exam tables and related equipment
Accessible room planning depends heavily on product selection. A height-adjustable exam table with transfer supports is usually the baseline choice for general medicine. Specialty tables may need powered back sections, pelvic tilt, or procedural accessories, but those features should not come at the expense of low height, side access, or lift compatibility. Reputable manufacturers publish dimensional drawings, weight capacities, and accessory options; these should be reviewed alongside room plans, not after construction.
Related equipment matters too. Wheelchair-accessible scales, patient lifts, transfer boards, gait belts, and seating with arms all contribute to equitable care. A clinic that buys an accessible table but lacks an accessible scale still creates a break in the patient journey. Likewise, imaging rooms, treatment bays, and phlebotomy areas need their own equipment strategies. As a hub topic, medical care and accessible equipment should be planned as a connected system, with exam tables acting as the anchor point rather than an isolated purchase.
Maintenance is often overlooked. If height-adjustable tables are not serviced, they become slower, noisier, and eventually avoided by staff. If lift batteries are dead or slings are stored elsewhere, the practical result is the same as not owning the equipment. Accessibility depends on readiness, not inventory alone.
Operational policies, staff training, and patient experience
Even well-designed rooms fail without operational discipline. Staff should know which rooms are equipped for accessible exams, how to reserve them, how to set the table for transfer, and when to use a lift instead of manual assistance. Training should cover respectful communication, consent during transfers, sling selection where applicable, and emergency response if a transfer is interrupted. Clinicians should never ask family members to perform physical assistance that staff or equipment should provide.
Patient experience improves when access is predictable. Scheduling teams should be able to note mobility needs without making patients repeatedly explain them. Front-desk and clinical staff should avoid assumptions about what a patient can or cannot do. Some wheelchair users transfer independently if the table lowers sufficiently and the side is clear; others need a board, a gait belt, or a full mechanical lift. Asking directly and preparing the room before the patient enters saves time and preserves dignity.
Documentation also matters. Facilities should keep equipment specifications, maintenance records, and transfer policies readily available. During complaint investigations or accreditation reviews, those records help demonstrate that access is planned, funded, and implemented systematically.
Common mistakes in exam room accessibility
The most common mistake is treating minimum code compliance as the finish line. A room can technically allow wheelchair entry yet still be unusable for an exam. Other recurring errors include placing the table against a wall on both long sides, selecting fixed-height tables, ignoring the width added by paper dispensers or side rails, and storing mobile equipment in the transfer zone. Another frequent problem is specifying a floor lift without confirming compatibility with the chosen table base.
Renovations create special risks because existing plumbing walls, door locations, and millwork can pressure teams into compromised layouts. When space is tight, it is better to create fewer truly accessible rooms than many rooms that only appear accessible. However, those rooms must be distributed sensibly, scheduled effectively, and equipped to provide the same scope of examination available elsewhere in the practice.
How to evaluate an existing facility and plan improvements
Start with a room-by-room audit. Measure the current clear floor spaces, identify transfer side obstructions, review table height ranges, and test whether a selected lift can approach and operate. Next, interview frontline staff about where transfers actually break down. Their answers often point to simple fixes such as relocating a hamper, changing door hardware, or replacing a base style on future table orders. Then prioritize capital upgrades: height-adjustable tables, accessible scales, and lift-compatible rooms usually produce the largest gains first.
For larger programs, build an accessibility standard into procurement and design review. Require dimensional submittals, mockup testing, and sign-off by clinical users, facilities staff, and accessibility specialists. Link exam rooms to related improvements in toilet rooms, check-in counters, patient changing areas, and diagnostic spaces so the care path is continuous. If you manage multiple sites, standardize the accessible room template. Consistency reduces staff confusion and improves patient confidence.
Accessible exam table clearances are the practical center of equitable medical care because they turn policy into usable care at the point of examination. The essential lessons are clear: designate a true transfer side, choose height-adjustable tables that lower sufficiently, confirm compatibility with floor or ceiling lifts, protect clear floor space from daily clutter, and train staff to use the room and equipment properly. When those elements align, patients with disabilities receive fuller examinations, staff work more safely, and providers reduce legal and operational risk.
As the hub for medical care and accessible equipment within ADA accessibility standards, this topic connects directly to accessible scales, diagnostic devices, patient toilet rooms, check-in areas, and transfer-support policies. If you are planning a renovation, equipment replacement, or compliance review, begin with the exam table and trace the full patient journey outward. Measure the room, verify the product data, run a mock transfer, and fix the barriers you find. That approach produces exam spaces that are not merely compliant on paper, but genuinely usable in everyday care.
Frequently Asked Questions
Why do exam table clearances matter so much for side transfers and lift-assisted transfers?
Exam table clearances directly affect whether a patient can transfer safely, efficiently, and with dignity. In accessible healthcare design, the exam table is not just a piece of equipment; it is a functional transfer destination that must work for patients using wheelchairs, scooters, walkers, and portable lifts. If there is not enough open space next to the table, a patient may be unable to position their mobility device close enough for a lateral move. If there is not enough room at the base or surrounding the table, a floor lift may not be able to approach, turn, or align properly for a supported transfer.
These clearances also shape staff safety and workflow. When rooms are too tight, clinicians and assistants often have to improvise awkward body positions, reach across equipment, or move furniture during care. That increases the likelihood of staff injury, patient falls, and delayed treatment. By contrast, when clear floor space is intentionally planned, side transfers can happen with better alignment, more control, and less physical strain on everyone involved.
Clearances are especially important because accessibility failures at the exam table can undermine the entire patient visit. A clinic may have an accessible entrance, compliant corridors, and an accessible restroom, but if the patient cannot actually get onto the exam surface, the medical encounter is compromised. For that reason, planning around side transfers and lift use should be treated as a core clinical function, not a secondary layout issue.
What kind of space should be planned next to an exam table for a safe side transfer?
For a side transfer to work well, there must be usable clear floor space alongside the exam table that allows a wheelchair or other mobility device to pull up parallel to the transfer surface. The goal is to create enough room for positioning, alignment, and staff assistance without forcing the patient into a difficult angle or leaving no place for caregivers to stand. In practical terms, that means the transfer side of the exam table should not be crowded by casework, fixed chairs, carts, waste bins, or projecting equipment.
Good planning focuses on real-world use, not just minimum theoretical dimensions. Designers should think about how a patient approaches the room, turns into position, and parks close enough to transfer. They should also consider the swing of doors, the footprint of companion seating, and the space required for staff to guard the transfer or assist with clothing, balance, and medical lines. Even small obstructions can make a transfer much harder if they occupy the one place where a wheelchair needs to fit.
It is also important to remember that transfer direction matters. Some patients can only transfer to one side because of strength, pain, paralysis, or a prosthetic limb. Whenever possible, rooms should be planned so accessible transfer conditions are consistently available rather than treated as an exception in only one room. A layout that supports close side approach, stable positioning, and caregiver access will serve a much wider range of patients and reduce the need for last-minute room changes.
How should a medical room be designed if a portable floor lift may be needed?
If a portable floor lift may be used, the room needs more than simple standing space around the exam table. It needs a clear operational zone that allows the lift base to enter, spread as required, move into position, and withdraw without colliding with cabinetry, stools, scales, or wall-mounted equipment. The exam table itself also has to be compatible with lift use, including adequate base clearance or leg geometry that does not block the lift from approaching close enough for a safe transfer.
One of the most common planning mistakes is assuming that if a lift can fit through the doorway, it can function in the room. In reality, lifts need turning radius, approach space, and room for caregivers to walk with the device while monitoring the patient. Tight corners, fixed furnishings, and narrow gaps near the table often make lift use impractical. Designers should account for the full maneuvering path from entry to transfer location, including where the patient’s wheelchair, companion chair, and clinician stool will be during the transfer process.
Room design should also support predictable workflow. Staff should not have to remove furniture, relocate supply carts, or rotate the exam table in order to use a lift. The more steps and improvisation required, the less likely lift-assisted transfer will happen smoothly under time pressure. A well-planned exam room anticipates that lift use is a normal part of care for some patients and provides the clearance, equipment compatibility, and staffing space needed to make that process safe and repeatable.
What room features most often interfere with accessible exam table clearances?
Several common room elements can compromise otherwise good intentions. Fixed base cabinets placed too close to the transfer side of the exam table are a frequent problem because they eliminate the parallel approach needed for a wheelchair. Oversized door swings can consume valuable maneuvering space or block the area where a mobility device needs to stop. Rolling carts, supply towers, trash receptacles, and guest seating can also become informal obstructions if the room is already tight.
Another issue is equipment clustering near the head or side of the table. Items such as diagnostic walls, monitor arms, sharps containers, and glove boxes may seem minor individually, but together they can limit caregiver movement and force transfers to occur in a constrained posture. Table base design can be another hidden barrier. Some exam tables have pedestal shapes, support legs, or under-table components that interfere with wheelchair footrests or prevent a floor lift from getting close enough to the patient.
Designers and clinic operators should also pay attention to what happens after occupancy. A room that appears accessible on paper can lose its functionality once added furniture, printers, hampers, and portable devices accumulate. That is why accessible clearance planning should include both initial layout and operational standards. Staff need designated storage locations and room setup protocols so the transfer zone next to the exam table stays open and usable during everyday care.
How can clinics plan exam rooms that remain accessible across different specialties and patient needs?
The most effective strategy is to design for flexibility from the beginning. Accessible exam rooms should accommodate independent side transfers, assisted transfers, and lift-assisted transfers without requiring extensive reconfiguration. That means selecting height-adjustable exam tables, preserving clear floor space at key approach points, avoiding permanent obstructions near the transfer side, and confirming that the table base works with both mobility devices and portable lift equipment.
Clinics should also think beyond a single room type. Different specialties may add ultrasound equipment, procedure carts, imaging accessories, or specialty chairs, all of which can affect clearances. Standardizing accessible planning principles across room templates helps prevent one department from creating barriers that another has already solved. In many cases, it is better to establish a high-performing accessible room standard for all new fit-outs rather than limiting accessibility to only one designated room that may be unavailable when needed.
Operational planning matters just as much as physical design. Staff should know which rooms support lift use, how to stage equipment, how to keep transfer zones clear, and how to respond when a patient needs extra setup time. Clinics that combine thoughtful room layout with clear transfer protocols are much better positioned to provide equitable care. Ultimately, accessible exam table clearances are about making sure the room works for the patient in front of you, not just meeting a checklist on paper.