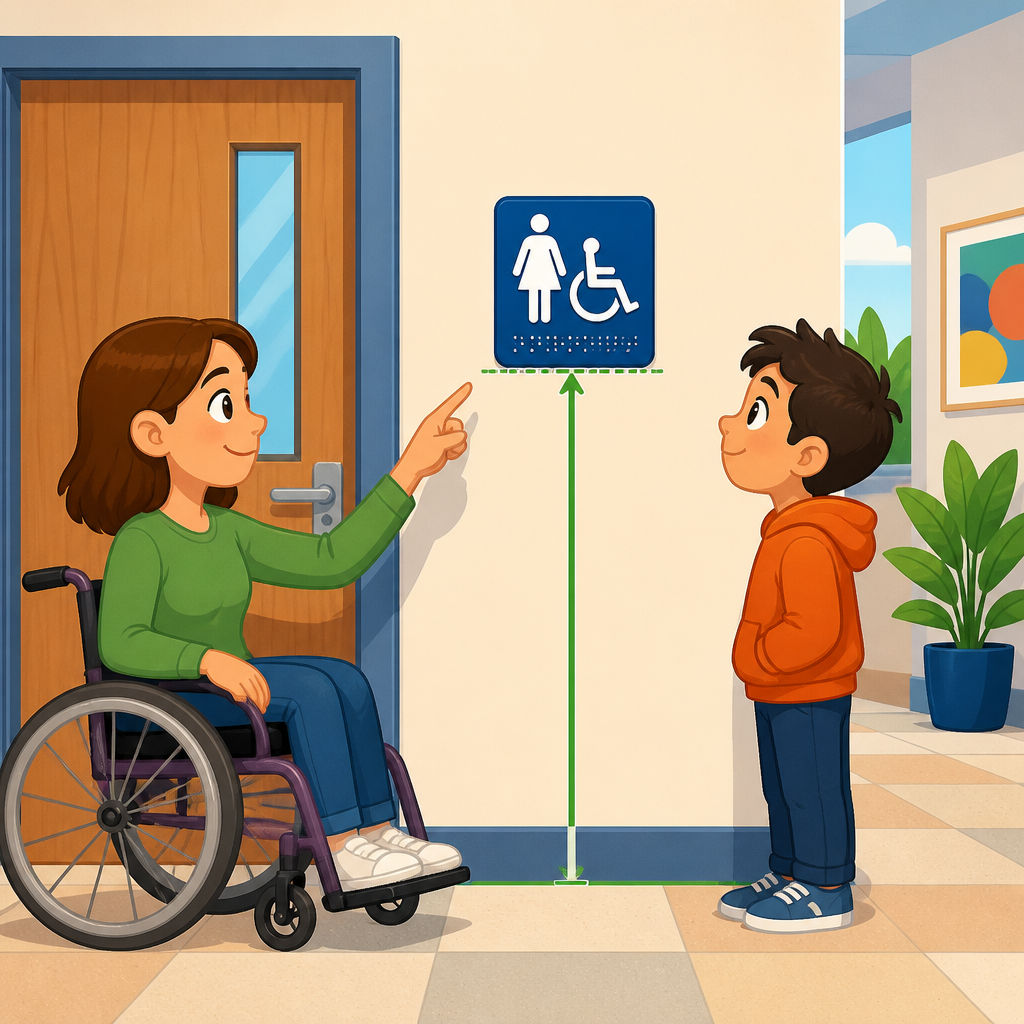
Mounting height for tactile ADA signs is one of the most misunderstood parts of compliant signage, and the confusion usually starts with a simple question: what exactly are you measuring, and from where? In practice, the answer is precise. For tactile signs that identify permanent rooms and spaces, the measurement is taken from the floor to the baseline of the lowest tactile character, and that baseline must fall between 48 inches minimum and 60 inches maximum above the finished floor. If you measure to the top of the sign, the centerline, or the braille, you can install a sign that looks acceptable but still fails inspection.
This matters because tactile ADA signs are not decorative graphics. They are functional accessibility devices governed primarily by the 2010 ADA Standards for Accessible Design and, in many jurisdictions, coordinated state or local building code provisions such as ICC A117.1. In schools, hospitals, offices, hotels, multifamily housing, and public buildings, these signs support independent navigation for people who are blind, have low vision, or rely on touch reading. I have seen projects delayed at final walkthrough because contractors mounted every room identification sign at a consistent visual height rather than a compliant tactile reading height. The signs looked neat. They were also wrong.
Within signage and wayfinding, mounting height is only one part of a larger system that includes sign type, placement, contrast, character depth, braille, pictograms, and circulation planning. This page serves as a hub for that full topic, with special focus on measuring from the baseline because that is where many fabrication and installation errors begin. When a sign package is planned correctly, the mounting height rule becomes straightforward. When it is planned late, after paint, door hardware, and millwork are already in place, conflicts multiply quickly.
To use the rule correctly, define three terms clearly. A tactile sign is a sign with raised characters and braille intended to be read by touch. A baseline is the invisible line on which the bottoms of the tactile uppercase characters sit. Finished floor means the completed floor surface, not the subfloor or slab. Those definitions sound basic, but they determine whether a sign lands inside the permitted range. They also connect directly to other wayfinding decisions, including where signs are placed relative to doors and how visual signs work alongside tactile room identification signs.
What the mounting height rule requires
The core requirement is simple: the baseline of the lowest raised character on a tactile sign must be at least 48 inches above the finished floor, and the baseline of the highest raised character must be no higher than 60 inches above the finished floor. On many standard room signs, all tactile text sits in one block, so installers often focus on the lowest line because that line controls the minimum reading height. However, if the sign has multiple tactile elements stacked vertically, the top tactile line can also create a violation if it rises above 60 inches.
This requirement applies to tactile signs that identify permanent rooms and spaces, such as restrooms, stairwells, exit stair enclosures, electrical rooms, conference rooms, hotel guest rooms, and classrooms. It does not automatically apply to every sign in a building. Directional signs, temporary notices, tenant directories, and many overhead visual wayfinding signs follow different rules. One of the most common mistakes I see is using one mounting standard for every sign type on a project. Good wayfinding programs separate tactile identification signs from visual informational signs early in the schedule and document different mounting details for each.
The reason baseline measurement matters is practical. Tactile readers locate and scan raised text with their hands, not with their eyes alone. Measuring to the baseline ensures the actual readable characters fall within a consistent ergonomic zone. If you measure to the sign panel edge instead, the reading area can drift too high or too low depending on panel size, logo placement, decorative borders, or insert windows. That inconsistency is exactly what the baseline rule prevents.
How to measure from the baseline correctly in the field
Start by finding the lowest line of raised text on the sign. Ignore braille for mounting height purposes. Ignore the overall plaque size as well. Identify the tactile characters that are intended to be read by touch, then imagine a horizontal line running along the bottom of those characters. That is the baseline. Measure vertically from the finished floor directly below the sign to that line. If the measurement is between 48 and 60 inches, the lowest tactile line is within range.
Fabricators can make this easier by including a shop drawing dimension from the bottom of the plaque to the baseline of the lowest tactile line. Installers should not have to guess where the baseline sits after the sign arrives on site. On larger projects, I recommend creating a signage installation schedule that lists each sign type, its plaque height, tactile copy zone, braille location, and target mounting height. That one document prevents repeated field math and reduces inconsistent placement across multiple floors.
Finished floor deserves attention too. Carpet tile, stone thresholds, resilient flooring, and raised access floors can change the final elevation enough to matter. In renovations, signs are often mounted before flooring transitions are complete, and that can produce noncompliant results by closeout. The safest process is to confirm the final floor finish in each area before installation and spot-check dimensions with a steel tape after signs are mounted.
Placement on the wall and door approach considerations
Mounting height is only compliant when the sign is also placed in an accessible location. Tactile room identification signs are generally mounted on the wall beside the latch side of the door. If there is no room on the latch side, standards allow alternate locations, but the sign still needs a clear floor space so a person can approach and read it without standing inside the door swing. This is where signage and wayfinding overlap with architectural planning. A technically correct height means little if the sign sits behind an open door or over a protruding object.
Double doors, pairs with active leaves, narrow sidelights, and frameless glass entries often create placement problems. In healthcare and higher education, I regularly see late design changes that add access control devices, crash rails, or equipment cabinets exactly where tactile signs were intended to go. When that happens, the team should reevaluate the wall location, verify maneuvering clearances, and maintain the correct baseline height in the new position. Moving the sign a few inches horizontally is usually manageable. Moving it onto the door itself is generally not acceptable for permanent room identification.
For exit stair doors, restroom entries, and hotel guest room corridors, consistency matters as much as compliance. Users build expectations from repeated placement. When every tactile sign is in the same relative location and within the same reading height band, navigation becomes faster and less stressful. That consistency is a hallmark of strong wayfinding systems, not just code minimum performance.
Common mistakes that cause failed inspections
Most failed tactile sign inspections come from five recurring errors: measuring to the sign top, centering the plaque at 60 inches, mounting to the braille location, placing signs on the push side where the door swing interferes, and treating decorative sign families like compliant tactile products without checking the actual character block. Another frequent issue is mixed-use signs. For example, a room sign may include a visual title, a changeable insert, a logo, and a tactile line at the bottom. If the installer aligns all signs by top edge, the tactile baseline can end up too low on short signs and too high on tall signs.
Renovation work adds more traps. Existing wall protection, chair rails, wallpaper reveals, and control devices often tempt installers to “split the difference” and place signs wherever they fit. Inspectors do not grade on visual convenience. They check the standards. I have also seen teams assume that because a sign vendor claims an ADA-compliant plaque, the installation must be compliant too. Product compliance and installed compliance are separate issues. A perfectly fabricated tactile sign can still fail when mounted at the wrong height or in the wrong location.
| Issue | What happens on site | Correct approach |
|---|---|---|
| Measured to top of plaque | Raised characters land outside 48 to 60 inch range | Measure to baseline of lowest tactile characters |
| Used centerline standard | Tall plaques vary widely in readable height | Dimension sign type by tactile copy zone, not panel size |
| Ignored finished floor changes | Carpet or threshold shifts final mounting dimension | Verify measurements after finish installation |
| Placed sign behind door swing | User cannot approach sign safely to read by touch | Use latch-side wall or approved alternate clear location |
| Installed every sign type the same way | Directional and tactile signs get mixed standards | Separate sign types in schedule and installation details |
How tactile mounting height fits into a complete wayfinding program
Signage and wayfinding work best when tactile signs are part of a layered information system. Tactile room identification tells a user where they are at the point of arrival. Directional signs tell them how to get there beforehand. Overhead signs support long-distance orientation. Directories and maps provide overview context. In a hospital, for example, a visitor may follow visual directional signs to Radiology, confirm the corridor with overhead markers, then use a tactile room identification sign to verify the exact suite upon arrival. Each sign type has a different job, and only some require tactile mounting by baseline.
As a sub-pillar within ADA accessibility standards, signage and wayfinding also connects to topics that deserve their own detailed articles: braille specifications, character contrast, pictogram field requirements, protruding object limits, accessible means of egress signage, temporary versus permanent sign rules, and multilingual wayfinding strategy. A strong hub page should help building owners and project teams understand these relationships. Mounting height is often the first compliance question, but rarely the last. Once teams understand baseline measurement, they usually ask the next right questions about placement, fabrication, and system consistency.
The business value is real. Correct signage reduces rework, speeds inspections, supports safer circulation, and improves user experience. For properties with frequent visitors, such as clinics, campuses, airports, and civic buildings, effective wayfinding lowers staff interruption because people can navigate independently. Accessibility compliance is not just about avoiding citations. It is about making the building usable the first time someone enters it.
Best practices for designers, fabricators, and installers
The cleanest projects solve tactile sign requirements in design development, not after punch list. Architects should show expected sign locations in door and room elevation sets. Interior designers should coordinate sign family sizes with tactile copy blocks so the baseline can be mounted consistently. Sign fabricators should provide shop drawings that label raised text, braille, and baseline dimensions explicitly. General contractors should assign installation to crews who understand accessibility tolerances, not just finish carpentry aesthetics.
For facilities teams, standardization pays off. Create a room sign template library with approved mounting notes, then train maintenance staff to use those standards during tenant improvements and space renumbering. Keep a field guide that distinguishes permanent room identification from temporary notices and wayfinding graphics. If a project spans multiple jurisdictions, confirm whether local code amendments add stricter provisions, because some agencies interpret placement details more aggressively even when the federal baseline rule is unchanged.
A final practical tip: mock up one corridor before full installation. Measure the tactile baseline, verify latch-side placement, test door swing clearance, and review the signs from both a visual and tactile user perspective. That half-hour exercise routinely catches issues that would otherwise be repeated hundreds of times across a building.
Mounting height for tactile ADA signs comes down to disciplined measurement and coordinated wayfinding planning. The rule itself is clear: measure from the finished floor to the baseline of the lowest raised character, and keep that readable zone within 48 to 60 inches. The challenge is not the math. The challenge is applying that rule consistently across varied sign types, door conditions, finish elevations, and field constraints without drifting into assumptions based on appearance alone.
For anyone responsible for ADA accessibility standards, this is the key takeaway for signage and wayfinding: compliant tactile signs depend on both proper fabrication and proper installation. Baseline measurement, latch-side placement, clear approach space, and sign-type distinctions all matter together. When teams document those requirements early and verify them in the field, inspections go more smoothly and buildings become easier to navigate for everyone.
If you are building or updating a signage program, use this page as your starting point, then review each related signage and wayfinding topic in detail before fabrication begins. A small correction on paper is cheap. Reinstalling an entire floor of room signs is not.
Frequently Asked Questions
What does ADA actually require you to measure when mounting a tactile room identification sign?
For tactile ADA signs that identify permanent rooms and spaces, the required measurement is taken from the finished floor up to the baseline of the lowest tactile character on the sign. That point—not the top of the sign, the bottom edge of the panel, the centerline of the plaque, or the braille line—is what determines whether the sign is mounted at a compliant height. Under ADA rules, that baseline must be at least 48 inches above the finished floor and no higher than 60 inches above the finished floor.
This is where many installation mistakes happen. Installers often assume they should measure to the bottom of the sign blank or to the lowest raised element, but the standard is more specific than that. The “baseline” means the invisible line on which the lowest tactile letter sits. If the sign has multiple lines of raised text, you look at the lowest tactile line and measure to the baseline of those characters. This matters because signs can vary widely in overall height, margins, logo placement, and braille position. Measuring to the character baseline ensures the readable tactile text itself falls within the reach range intended by the ADA.
Does the 48-inch to 60-inch mounting range apply to the whole sign or just the tactile text?
The 48-inch to 60-inch range applies specifically to the baseline of the lowest tactile character, not to the entire sign panel. That distinction is critical. A sign may be large or small, include a pictogram field, feature several lines of text, or place braille beneath the wording, but the compliance test still comes back to one reference point: the baseline of the lowest raised character. As long as that baseline falls between 48 inches minimum and 60 inches maximum above the finished floor, the sign can meet the height requirement even if other parts of the sign extend above or below that zone.
In practical terms, this means two signs of different sizes may both be compliant even though their top and bottom edges sit at different heights. For example, a compact restroom sign and a taller room sign with a pictogram may not line up perfectly at the top or bottom, yet both can still satisfy ADA mounting requirements if the tactile text is properly positioned. This is why professionals do not rely on a fixed “mount the top at X inches” rule. Instead, they evaluate the sign’s layout first, identify the baseline of the lowest tactile text, and then set installation height accordingly.
How do you find the baseline of the lowest tactile character on a sign with multiple lines of text, braille, or pictograms?
To find the correct measurement point, start by identifying all raised tactile characters on the sign. If the sign has more than one line of tactile text, locate the lowest line of raised lettering. The baseline is the line that those characters sit on, just as printed text sits on an invisible baseline in typography. Measure from the finished floor vertically to that line. Do not measure to the bottom of descenders, the braille dots, decorative elements, pictogram frames, or the edge of the sign substrate unless one of those happens to coincide exactly with the required baseline—which usually they do not.
Braille placement often creates confusion because it is typically positioned below the tactile text. However, braille does not determine mounting height under this rule. Likewise, pictograms and visual-only headers may occupy a large portion of the panel, but they are not the controlling point for the 48-inch to 60-inch requirement. On signs with custom layouts, it is smart to review a shop drawing or production proof before installation. That allows you to identify the baseline in advance and avoid guessing in the field. When signs vary from one room to the next, this step becomes especially important because a single mounting template based on sign edges may not keep every sign compliant.
What does “finished floor” mean when measuring ADA sign height, and why does it matter?
“Finished floor” means the final walking surface in place once the area is complete, such as tile, carpet, concrete finish, wood, or other installed flooring material. ADA mounting height must be measured from that actual finished surface, not from the structural slab, subfloor, or an assumed elevation during construction. This matters because even relatively small flooring differences can affect the final installed height enough to push a sign out of compliance, especially when trying to keep a consistent installation standard across multiple rooms or corridors.
In the field, this becomes important during renovations and phased construction. If signs are mounted before finish flooring is installed, the final floor height may rise and reduce the measurement to the tactile baseline. Conversely, if there is a floor transition between spaces, installers should confirm which walking surface is the relevant reference point at the sign location. The safest approach is to measure after finish flooring is complete whenever possible. If that is not possible, installers should account for the exact finished floor buildup in their layout calculations. Precision here helps avoid rework and ensures the sign remains within the required 48-inch to 60-inch range once the space is occupied.
What are the most common mistakes people make when installing tactile ADA signs, and how can they avoid them?
The most common mistake is measuring to the wrong part of the sign. Many people use the top edge, the bottom edge, or the center of the sign because those points are easier to see and align, but ADA compliance for tactile room identification signs is based on the baseline of the lowest tactile character. Another frequent error is assuming that every sign in a facility can be mounted at the same top height regardless of design differences. That can work only if the tactile text is positioned consistently on every sign. If layouts vary, identical top-edge mounting can produce different tactile baseline heights and create compliance problems.
Other mistakes include measuring from the wrong floor reference, installing before final flooring is in place, overlooking signs with multiple tactile lines, and confusing tactile sign rules with general wall-mounted signage practices. To avoid these issues, verify the sign type first—because the baseline rule applies to tactile signs identifying permanent rooms and spaces—then review the exact tactile text location on the sign face. Use a tape measure from the finished floor to the baseline of the lowest raised character, not to the braille or plaque edge. Many installers also benefit from creating a simple field checklist or marking the baseline position on the back of each sign before installation. That small step can save time, prevent failed inspections, and ensure the sign is both readable and compliant.